I’m currently trying to serve two masters. I’m desperately trying to get this mini finished so that it can be drivable in the fine, warm dry, summer we’re bound to have for a couple of days some time between June and September. And I’m also trying to get the Sabre finished, or at least properly started by getting the chassis powder coated soon. And it does need to be soon, if I’m to stand any chance of getting out for Anglesey in August.
But for the moment I’m focussing on getting the mini ready for painting. In the last couple of weeks, I’ve got loads done… but it does seem that I’ve been in the garage getting oily every waking moment I’m not at work these days.
So what have I actually achieved?
All of the welding at the front of the car is now complete. The wings are all welded in, all the little jobs like spotting in the headlamp support shrouds and the lower front valance joints are done. I’ve even managed to remember the little angle brackets, that support the A panel to wing joints at the wheel arch edge as well. Beyond this I’ve also seam sealed all of the inside of the front wings, I’ve sealed the wing to windscreen surround gaps and cleaned and dressed the joint margins on the body seams. plus I’ve touched up any under wingand paint nicks or scratches. Essentially in front of the engine bay firewall the car shell is complete. :-)
All that remains on the shell is to.
- Spot weld the right hand sill join, as I seamed it and tbh I think belt and braces is better.
- Weld in the rear seatbelt mounts.
- Repair any thing else that I find… but the only thing I’ve seen is a small rust spot on the passenger door A post.
- Cleanup any welds or seams that are outstanding, most notably on the back valance.
- Paint (POR15) the inside panels where the existing paint has been damaged by the structural welding underneath.
- Dress back and paint the internal welds on the floor pans and passenger side inner sills.
So we are pretty much done, once the shell is complete… I’ll take it to my friendly MOT garage, and make sure they are happy with the structure and would pass it before I start getting paint chucked at it.
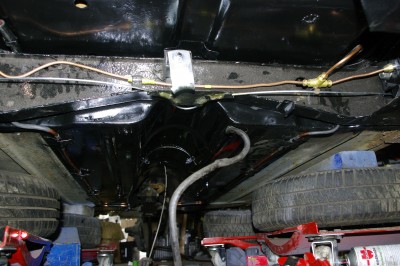
 So on with the mechanics, you may recall that I’d rebuilt the front subframe, with all new fittings. The only thing that was standing in the way of refitting it, (again with new rubbers, mounts, fittings and fasteners). Was the fact the that I needed to fit the front to back brake and fuel lines. These had all either corroded or been nicked with an angle grinder…. which had the potential to be very entertaining, when I did it to the fuel line.
So I’ve spent a few “pleasurable” hours cleaning back and POR15 the floor channels where the lines run. Of course once this had dried actually fitting the lines entailed dropping out the fully rebuilt rear subframe (again!) in order to get the tubes bent over the subframe as per the original fitment. The underside is now looking very spiffy, with only a couple of areas remaining to be cleaned and painted…. it remains to be seen how well the PO5 15 performs in this areas. The lines themselves had to be cushioned from the steel clips, and this was achieved with some shrink wrap that I bought to do the cabling for the Sabre.
So what’s left then…. well three main components… engine + gearbox, front hubs and drive shafts, and the interior.
I’ve cleaned the engine, but if the car’s going to go back on the road this year, then she will have to be refitted as is and make do with a new clutch, new fuel pump, new water pump, new hoses and all new gaskets and oil seals. I’ve even ordered the Mini Spares selector rod gearbox seals. Then next winter I’ll fit the spangly twin carbs and LCB exhaust I had planned for her.
 So that leaves the running gear, as I’ll do the interior after the paint has landed.
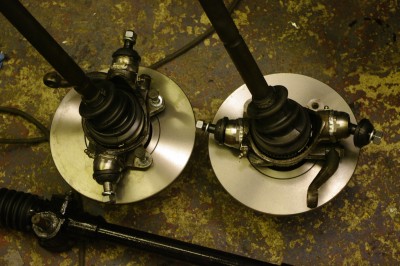
I spent about 18 hours, cleaning the 30 years of accumulated grot off the front hubs and driveshafts. Then refitted new ball joints, new main bearings, new bearing seals, new CV joint boots, and new brake disks. The last thing that’s needed will be a calliper rebuild and I’ve got the new seals already for those. So this spangly picture is off two fully reconditioned front assemblies ready to bolt to the new subframe when it is refitted. Also in the picture is a partially reconditioned rack. The rack itself had no play so it’s simply had new boots, new tie rods and protective coat of POR15, and is now ready for refitting.
Incidentally, while doing the somewhat laborious job of shimming the ball joints I was struck by the fact that the last time I did this was some 18 years ago, with my dear old Dad… when he was teaching me how. I learned all I know about cars from him and I had a spanner in my hand with him from an early age… Kids these sadly days lack those sort of role models, as indeed so do I as he passed away soon after my Daughter was born ( she gets her driving licence in 3 weeks). Still, I use the skills he taught me and tools he left me every single day. And I often hear his voice in my head “Stop leaning on it so hard, You’re going to shear that bloody bolt off, a sure as god made little apples!” ![]() Except these days I’ve learned to listen to him
Except these days I’ve learned to listen to him ![]() . I might be building this car for my wife, but I I’m doing it in his memory. Here’s to you Dad.
. I might be building this car for my wife, but I I’m doing it in his memory. Here’s to you Dad.
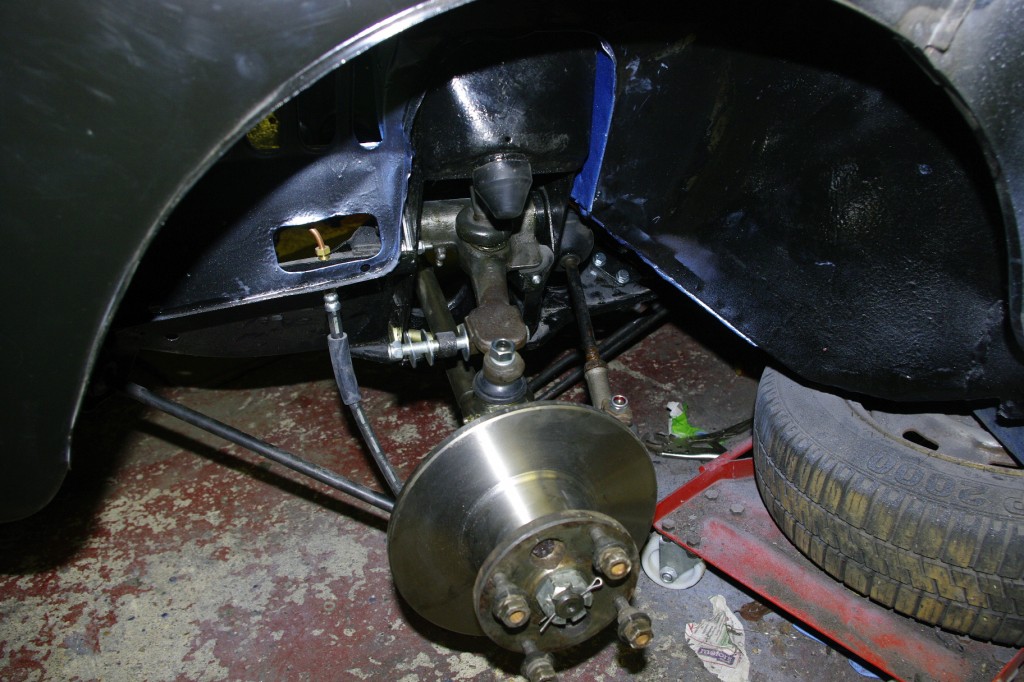
I expect to get the front subframe and running gear back in this week then she can go back on her wheels for the first time in 9 months for a final (small) round of welding and seam sealing before we prep for paint.
I reckon I’m well north of 650 Man Hours on this project now…. and about £2000 quid in parts and panels. Certainly the pile of empty Mini Spares/ Mini Sport parts bags and boxes is growing ever bigger.
Infact since i wrote most of this post last night,and indeed this morning the subframes went back in, the suspension has been remounted.
