You know those days… the ones when nothing seems to go right, and you go out to the garage with a mental list of what you want to achieve…and 8 hours later you leave the garage tired and gritty but not having completed a single thing?
Well today was not one of those days. I got loads done.
It didn’t start auspiciously though. As I stepped into the garage it was -12 deg C and I was stiff with cold, and every bit of metal I picked up nearly took my skin off. Enough of this! I need some heating, so I high tailed it over to Machine mart and bought one of their little devil propane space heaters. What a marvellous little beastie… it soon had the garage well into, not quite freezing territory. Still on with the Sabre ![]()
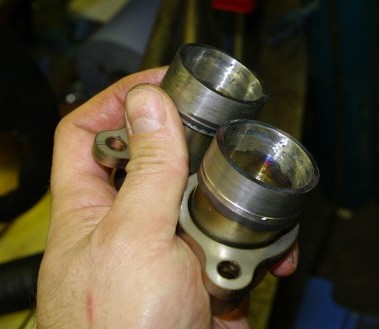
 First up were exhaust headers, Andy over at AB Performance follows my blog and is keeping track of my progress. So with the engine nearly in he thought it was time I got on with the exhuast headers, and has sent me the appropriate collars to fit the zx10, some laser-cut bolt flanges, and some little step up conical sections that raise the exit port to 1 & 5/8″ in diameter. Of course these needed welding together. Andy recommended that I TIG the back edge of the mounting collar onto the tube. I feared this would create a stress point, but perhaps more importantly I feared I would burn through or at least sag through to the inside. So instead I autogenously (no filler) welded the tube inside the collar and then dressed it back with a little subtle grinding using a small stone in a die grinder. It didn’t take long and I was left with a small collection of what all the world look like stainless steel shot glasses. I can’t say for certain ( as I didn’t check the fit before hand) but the welding has expanded the collars slightly so I mounted them using the lathe inside grip jaws and span a mm off the exterior circumference. You can just see a slight depression inside the collars, but this is nothing major, and will not disrupt the gas flow, certainly not anymore than the edge that would have been present if I’d welded it on the outside.
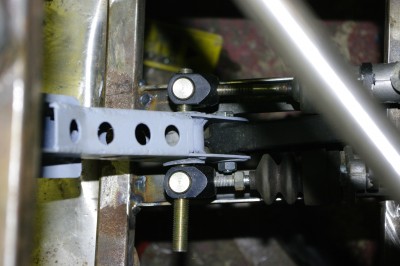
 With that job done, I moved onto to the front of the car. with the pedals now complete I wanted to get the brake pedal mounts welded into the car. These are a couple of small lengths of 1/8 x 1″ x 1″ angle welded across the footwell. It didn’t take long to cut the steel… in fact I also cut about 8mm off one leg of the angle to try and save a little weight from this chunky cross section. Then I MIGed it into place, and dressed back the welds underneath so that the floor plate will still sit flush. Coo we really are going great guns today.
You can see they are angled slightly, this is because I sit slightly angled in the car as the chassis tapers, in fact the offset angle is about half of the angle that the side of the chassis makes with the transverse cross members. Which I guess makes sense.
With the brake mounts in I could complete the front footbox reinforcing, so I cut, fettled in and then welded the top diagonal braces from 3/4″ tube. While doing this I also notice a couple of tubes where all four legs of the weld hadn’t been completed and these got some sparky attention too. One of the top tubes is visible in the pic above.
We’re close to finishing the structural work at the front of the car, so I thought I’d finish of the steering rack. I’d removed the little plastic bush from the non pinion end of the steering rack when I built it up, as these wear quickly. I’d grabbed some phospher bronze off ebay, for the sum total of 12 quid, and knocked up a littled cylindrical collar quickly. You can buy these from Burton Power for 15 quid + vat… but mine costs less and I have a foot of phosphor bronze for other projects too. Sorry I forgot to take a photo of it.
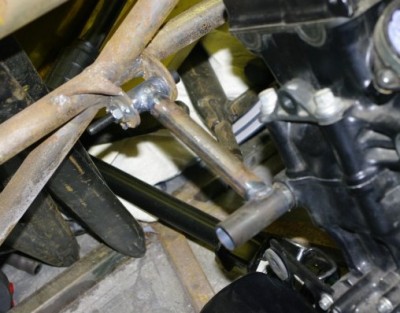
 So I’m now running out of stuff to do by my feet, so its was on with the engine mounts. Using Tim’s tube cutter I’ve now made both the top front mounts.
Basically this involved linked the bucket bushes that I made previously with some tube to the firewall mounts. The process, is cut the tube, fish mouth the end, tack in place then remove from the car and TIG in place. I need to do the lower leg of this triangular mount to finish it off. Once both legs are welded on I think I’ll put a small reinforcing plate across the end. The end of the bucket bushes will then be cut at an oblique angle to neaten them all up.
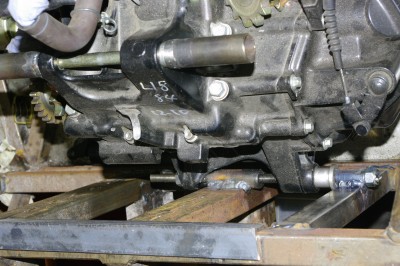
I’ve been cogitating on the rear low engine mounts for a while as they are basically in empty space. In the end I decided to just keep it simple and drop another chassis member down to support a bush by edge of the right hand mount. I can then run an M10 bolt in double shear.
I still need to do the left hand one. Which will simply be a short section of 1″ box welded onto the double chassis member, with a drilled plate.
In this Photo you can also see the bucket bushes I’ve prepared for the upper rear mounts. The one on the right in the picture is actually a threaded bush (m10 x1.25) to allow me to use the standard mount bolt that came with the engine.
Hopefully, I shall have the mounts finished off tomorrow, and then it is on to the gear change.
Now despite the fact that I’ve spent all day in the garage and I know I’ve got stuff done, when you stand and look at the beast it appears to be no different to the way it was this morning. Its always like that at this stage of the build…. you spend all day working and at the end of the day, you have just one small, but perfectly formed bracket, which when you stand back you can’t see at all. Roll on the day we send this beastie for power coating.
