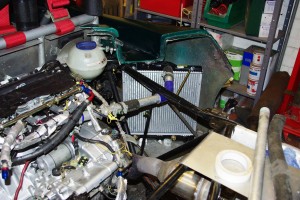
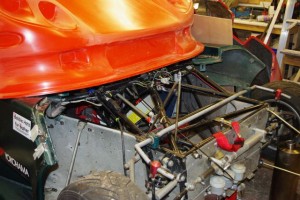
 This weekend saw completion and filling of the completely redesigned cooling system.
The system is now filled and appears water tight. We had one small small issue to resolve. primarily based on own own stupidity and the design of the new Honda Rad.
Firstly if you look carefully at the photo above, you’ll see two small brass tubes emerging from the bottom of the rad. I stupidly assumed that these were ancillary coolant connections and so I used one for the system fill point from the header tank, and blanked off the other. with the system complete we poured in the water and were somewhat surprised to see that the system capacity was 0.3ltr. Yes you guessed it the brass connections were for an integral oil cooler and we had actually filled the oil side of the cooler rather than the main cooling system. This caused a fairly hefty rethink and reposition of the hoses, so that we could actually fill the main coolant circuit. However it’s all done now and filled. System capacity is approx 3.5 litres. Previous system capacity had been nearer 5.5 so that is another couple of Kilos saved + the weight of the extra pipework that is hopefully now not needed, also the 3.5 ltr capacity compares pretty favorably with the standard installation capacity of 3.1ltrs.
Still it was quite funny to see the look of puzzlement on our faces as the system failed to fill when we had connected to the oil cooler circuit in the rad.
The electric water pump is now si ted on the cool side of the engine and the return line crosses the engine bay between the exhaust and the block. I’ve wrapped it in cooltek heat insulation to protect both the silcone elbow hoses and prevent heat soak.
The wiring for the pump and fan have both been transported from the front of the car, and repositioned to the rear. The Honda rad doesn’t include a port for a thermostatic switch to trigger the fan, so I’ve reverted to use the ECU controlled fan trigger. I just need to remember that in post race cooling I’ll need to leave the ignition on if the fan is to work. Either that or I might build in a separate switch.
All that’s left on the cooling system now is the “dry” stuff. Fit a new (lighter fan) I sourced from ebay and fit the Ali ducting in the side pod to ensure proper cooling. Duncan and I may yet decide that a fan is superfluous. He says “No, what about hot restarts after a red flag when you’re held on the grid”… I’m undecided.
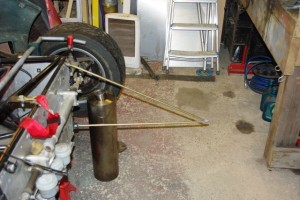
Other stuff that got done this weekend included welding in the new catalytic converter, and work on the new front floor area. Here we started building the support stays that both hold up the floor and transfer the aero load from the front bodywork to the main chassis. These look flimsy, but when connected to the floor produce a very rigid structure.

This should be enhanced by the fact that the new front has a moulded in splitter. so the floor is actually mounted inside a lip on the moulding and we intend to dsuz fastener the two parts together. An idea I nicked from Steve Robinson ![]() at Cadwell last year. When in Wickes buying plywood for the floor It occurred to me that as the body and floor will now be imparting rigidity to each other I no longer need the floor to be self supporting and can therefore use thinner 6mm ply rather than the 9mm I had previously used. Hefting both a 9mm and 6mm 8 x4 sheet confirmed that this was “a good idea”. Actually I bought a sheet of both, and will make a spare out of the 9mm stuff. If I bang it gently into the barriers like I did at Cadwell this year… the two components may well be damaged and I may need my spare to revert to being self supporting. An upside of moving the rad and all it’s housing to the back is that the spare is now completely flat and easily supported in the belly lockers of the Winnebago. With this in mind we’ll also make a spare set of bracketry that is also nice and flat and therefore easily carried in the ‘bago.
at Cadwell last year. When in Wickes buying plywood for the floor It occurred to me that as the body and floor will now be imparting rigidity to each other I no longer need the floor to be self supporting and can therefore use thinner 6mm ply rather than the 9mm I had previously used. Hefting both a 9mm and 6mm 8 x4 sheet confirmed that this was “a good idea”. Actually I bought a sheet of both, and will make a spare out of the 9mm stuff. If I bang it gently into the barriers like I did at Cadwell this year… the two components may well be damaged and I may need my spare to revert to being self supporting. An upside of moving the rad and all it’s housing to the back is that the spare is now completely flat and easily supported in the belly lockers of the Winnebago. With this in mind we’ll also make a spare set of bracketry that is also nice and flat and therefore easily carried in the ‘bago.
At the front a thorny issue remains outstanding…. how to fit the mandated 60mm front tow eye? There is no meaningful structure within 10 inches of the periphery of the front bodywork, and with no hole in the front body I’m unwilling to use the strop type arrangement I had previously. (it will just tear through the body if used in anger). It seems I have no alternative but to add some additional steel bracing to support an eye emerging halfway up the nose. Hmm
Weight loss…. As you can tell I’m rather obsessed with pulling weight out of the car…. but in honesty the easiest way of doing this is to pull some out of the contents of the drivers seat. (me!) Infact there is quite a large opportunity to do this around my middle. So the new year willpower test starts today. with only 5 weeks before the first testing outing there is still lots to do
