Ok, I last posted a couple of weeks ago in the run up to a planned test day at Snetterton on Tuesday 23rd October so that I had a fighting chance of turning up at the Birkett with at least a partially proven car . The car was mostly complete, but lots of little things needed finishing off, and some fairly major things were missing too. Consequently I’ve spent most of the last couple of weeks in the garage, so the first thing I must do here is to say “Thank you” to my wife Kate for her forbearance for the hundred or so hours I’ve spent in the garage over the last few days.
So Duncan and I have basically been spannering manically for every waking minute of the last fortnight when we weren’t at work. Plus I’ve had four days off work in an attempt to get ready.
Consequently, I’ve not taken many photos… but I’ll remedy that with a full walk around the now complete car in the next post or two.
To be honest it has all blurred together a bit but over the last week or so and exhaustion levels have been high, but the summary(culled mainly from my build notes and facebook posts) is as follows
- Front floor + frame fitted & cut to shape.
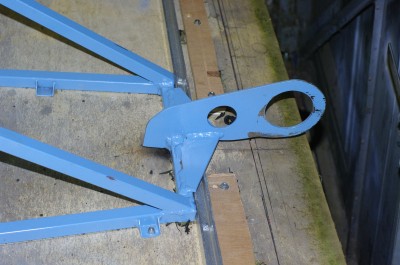
- Front towing eye fabricated and fitted to frame.
- Rear body work support frame fabricated and fitted.
- Dash, completed, wiring tidied up and sorted out.
- Engine bay cover fitted and cutdown, quick release fasteners fitted
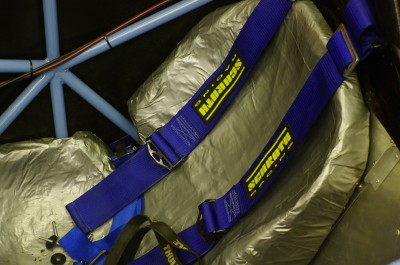
- Foam seat made and covered, harnesses fitted.
- Drive shafts fitted. new CV boots and one joint rebuilt.
- Rear lights and wiring fitted.
- Front and rear suspension + ARBs completed.
Of this little lot, the drive shafts bear some additional coverage. The drive shafts have standard motorsport outboard GKN Lobro joints, and inboard plunging ones. Andy Bates over at AB Performance, had been waiting for GKN to supply a complete new set for me, and they had failed to come through in time, so in extremis Andy supplied me with his pre existing set… these had also been sent to GKN so they could use them as a pattern, and they arrived back in the nick of time on the Friday before the Snetterton test. So that evening I set about fitting them up. However it quickly became apparent that all was not well.
Firstly the rubber boots were all nicked and cut and leaking grease, and one of the joints felt very odd when I manipulated the joint, so as I needed to replace the boots anyway, I disassembled the joint. What I found was that instead of all the drive balls inside the joint being correctly positioned inside the internal cage, four of them were simply sitting in the bottom of the drive cup. Additionally the outside pressing of the joint was all marked and mis-shapen, with what looked like screwdriver marks. The joint itself showed no signs of mechanical failure, overheating or excessive wear, so I concluded that it had simply been inexpertly disassembled (probably by GKN when they were measuring to make Andy his new ones).
So as I was now out of time to get an OEM replacement, and having been burned with cheesy after market crap before ( You may remember my 2010 Birkett was curtailed when a brand new after market joint failed after two laps) I rebuilt it….It took two hours to get it back together, repacked with grease and the new CV boot fitted. After which the other joint took 20 minutes to change the boot on, and thankfully it was mechanically unsullied, and that was Friday night concluded. I’d fit the joints first thing on Saturday. For my own records the CV boots are Shaftec BK55s.
On Saturday, we got on with the front floor, and Duncan hobbled his way around fitting, cutting and screwing it down to the correct profile. I busied my self at the back of the car, and got the rear panel and lights fitted, along with the necessary support frame to hold it all up. On top of this goes the engine cover which I also fitted.
Andy has used little m6 captive aerospace “nut plates” for all his fasteners on every body panel, and each corresponding part is fitted with a countersunk aluminium bobbin to spread the fastener loads into the GRP.
This is a good idea as it helps stop the fasteners from pulling out, but it does mean you either have to use countersunk cap bolts with a small hex drive or countersunk machine screws with a pozidrive fitting, neither of which are particularly quick to remove without the aid of a small battery drill/driver and both also tend to “round off” making removal very difficult. Besides on things like engine covers or damper access panels, you want them to be removable and replaceable without tools, and so 1/4 turn fasteners are my choice, preferable with a finger operated D ring. For the rest of the panels, at the moment, I standardised on Posidrive machine screws (I’ll swap them out for Dzus fasteners later) .. but for the engine cover we used 1/4 turn panex fasteners. This necessitating carefully drilling out the mounting bobbin to accept the larger shank of the fastener, and a clearance recess on the inside to allow it to be withdrawn from the substrate panel

Once I’d finished that, Duncan had finished the front floor, so we set about fitting the front towing eye. The Genesis always had a problem with towing because the all encompassing bodywork, meant I’d had to use a strop type of tow eye (basically a webbing loop bolted to a nearby chassis member), which was accessible through a small hole in the front bodywork covered by a number plate. But what this means in practice is that when the tow is off centre, the strop tended to pull through the body work to match the line of tension, thus tearing up any pretty GRP that got in the way in the process. Having had this happen more than once after I’d arrived in a gravel trap, we resolved to build a proper rigid eye on the Sabre that protruded through the front bodywork, like those on Radicals do. And which could be side loaded without destroying the GRP nose. Here it is, hewn, mostly by hand from 4mm steel….. do you think it is ever so slightly over engineered? And that was mainly that for Saturday.
Sunday was more of the same, the feature event was however Duncan’s 4th or 5th attempt to stick me into a racing car using two part expanding foam. The seat we’d made a couple of weeks ago turned out to be wrong, due to a lack of centre constriction, I’d sat too centrally in the car and the knee/arse/pedal angles were all wrong. So we started again, but this time with a central barrier made out of a spare lump of ply from the front floor holding me properly on the drivers side.
 I was sitting pretty surrounded by bright orange emergency Bivvy Bags, within which was some pleasantly warm 2 part foam just about finishing its curing process and gently cooking my nether regions, when Tim turned up to help me align the car.
Tim is a whiz at all things suspension, but him, me and Duncan did spend 45 minutes having a three way argument about how you setup a pushrod suspension system, which was moderately entertaining. Eventually having decided that the important is to first set first the bell crank angle, as this dictates the damper’s position in its travel, and hence the relative amount of travel available in bump and droop (we went for a 1/3:2/3 ratio Droop:bump). It also specifies where the suspension is on the rising rate curve and allows the actual ride height to be modified using the pushrods. Lastly we knew that it would also indirectly specify the suspension frequency by setting the spring seat position, once we sat the car back on its wheels and wound the spring seats up to return the bell cranks to their specified position. The purists might argue to set the frequency first and then work in the sequence, bell crank, droop/bump ratio/ride height & push rods…. but this sequence worked reliably and repeat-ably for us. The first step was to remove the springs and work out the totally damper travel available, so we could work out the droop/bump travel.
We cracked on and about two hours later the car was properly setup from a damper & pushrod point of view. Of it wasn’t without challenges and course we established the rear pushrods were a shade too long, so these had to have 5mm spun of each end in the lathe.
The magic number both front and back was 200mm between the lower damper housing, and the nearest edge of the upper damper spring seat. We set the car up level… 85mm at the front Datum, 85mm at the rear, 2mm front toe out, a smidge of rear toe in and 250lb springs all around.
Lastly Tim and I set the car’s alignment parameters. 2mm toe out at the front, and just a tiny smidgen of toe in at the rear. Oddly the car was much easier to push once we dialled out the 25mm of toe in that I had built it with ![]() . I had intended to build some alignment bars that could be bolted to the front and rear of the car, and allow string lines to be fitted perfectly parallel to the centre line of the car, and thus allow toe out to be specified simply by measuring the gap at each side of each wheel, but alas no time for that. With that Tim left with my thanks, and I cracked on with the last few odds and sods.
. I had intended to build some alignment bars that could be bolted to the front and rear of the car, and allow string lines to be fitted perfectly parallel to the centre line of the car, and thus allow toe out to be specified simply by measuring the gap at each side of each wheel, but alas no time for that. With that Tim left with my thanks, and I cracked on with the last few odds and sods.
Covering the seat in duct tape, fitting the front light covers, fitting mirrors, fitting the harness eyes and harnesses and so on. Which took me until about 11pm on Monday night and then until 9:30 am on Tuesday morning. The day of the Snetterton test (although I did get some sleep).
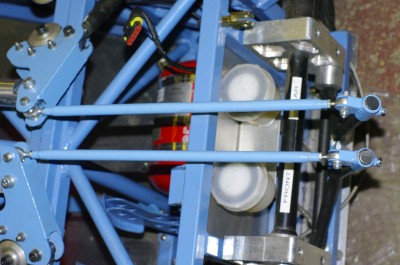
 I had hoped beyond hope to get the front ARB bearings from the suppliers on Monday, but alas no, so in the end I knocked up a couple of Ali spacers first thing in the morning and fully assembled the front ARB system for the first time. You can see the large spacer at the upper right corner of this picture, which allowed me to use the standard Sabre ARB on my prototype chassis. And with that it was time to dress her up and take her to the track for the first time.
Of course the first time you load a new car on the trailer you also have a learning experience .. will it fit? How do you lash it down? .. Will the shiny new winch work…etc. By the time I was done, and the Winnebago and racer were fuelled up ,and the tools and car loaded it was 10:30 and I’d missed the morning of the test or would by the time I got there. Still no matter it is an Open Pit Lane day, so I could still get some solid running in and shake down the car.
Now the bad news, Tuesday was foggy, and I had a call from Andy when I was about half way there to say the test day had been cancelled, and that no one had turned a wheel in the morning due to fog. If I didn’t attend I could get a refund, but if I turned up and and it cleared enough to do two laps – no refunds. So I opted out, as the prevailing advice at the circuit was unofficially – “Not much chance… but who knows”.
Sitting in the Layby on the way, before finally deciding to abandon the day I came to the conclusion that it was probably a blessing as after 4 extra long days and multiple evenings trying to get this thing finished I probably wasn’t in any condition to drive at the track anyway. A mate of mine totalled his new car on a test day, by accidentally changing up when heading towards the Druids hairpin at Brands…. when he should have hit the brakes. He put that down to brain exhaustion and I didn’t want to go that way.
Alas that means I was taking an unproven car to the Birkett, with no running, and no testing …. no the best of situations, and something I’d been working incredibly hard to avoid.
To add insult to injury I found out 3 days later that they did indeed run for most of the afternoon after the fog miraculously cleared. Arse! It wouldhave made me any less exhausted though.
