Right.. the best (and last) race of the season, the 750MC Holly Birkett 6 Hour handicap race is about a month away, so I’ve really got to get this beastie finished, in the next 3 weeks, if I’m going to get out testing before the race.
So to that end I’ve booked Thursday and Friday off this week, in the hope that a long weekend will see all the mechanical, work done, and that I’ll just be left with body work to fit, and suspension setup to do during October. So here’s my report from day 1
 This little collection of widgets are the components of my clutch pedal. The clutch has been playing on my mind for a while and having worked out the cable routing and mount, the first thing on my agenda was to finalise and install the pedal.
I’d ordered the clutch cabled from Cable-tec earlier in the week, and they turned it around in 24 hours. Which is great service… I also got them to send me a complete spare cable and couple of spare inner pull cables. So no excuses, it wa time to connect the engine to my feet.
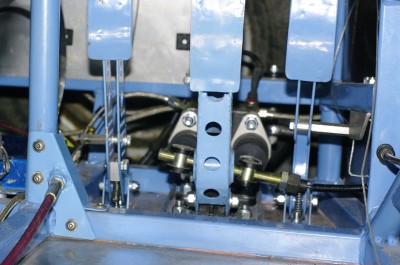
I had been pondering for a while on how to build the pedal stop to stop the thing falling towards me under pressure from the clutch springs. Eventually I decided to build the little aluminium widget near the pivot at the bottom of the pedal. This is actually in the right orientation, but will slip between the pedal sides. The long bolt will bear down on the bolts that actually mount the pedal on the floor. It will be kept under tension by a light compression spring to stop it unwinding. You can see it in position in the photo below, along with the painted up mounting widget and the clutch cable.
This photo actually covers a few hours work, and shows the 90% completed pedal arrangement.
A bit of a sit in the car, wearing my racing boots indicates that the arrangement is is mostly right, the throttle pedal just needs thinning down a bit to stop me accidentally hitting itwhen I plant the brakes. I once ended up in the wall at the hairpin at Cadwell due to that particular fault.
Anyway you can just see the throttle cable on the right, along with the throttle return stop on the chassis member. On the left is the clutch cable and mount. The mount has been fitted to M5 rivnuts in the chassis members. Both cables run down the sides of the footwell, well out of the way of my feet, so I’ve managed to keep the footspace clear on both sides. The clutch passes under the front of my seat, and then both cables exit to the engine high on the right hand side of the car behind my right shoulder… all very neat ![]()
You can also see that the brake adjuster cable is in place, and I can report that the the other end is connected to the dash controller knob.
In fact the brake installation is fully complete, except for the fact that the front brake lines aren’t attached to callipers… but they are all terminated and cut to length. The back lines are all fully installed and connected so tomorrow (with a bit of luck). I’ll be able to fill the reservoirs, and bleed the system.
I’ve said that the installation is 90% complete…. this is because I can’t finally fix the clutch cable as I may need to remove it in order to thread the fire extinguisher back into its cradle on the left of the pedals, it is currently away for its biannual inspection and refurbish at Lifeline fire systems.
 The throttle pedal can’t have have the cable finalised, because I’m just finalising the air box, and that means removing the throttle bodies,which in turn, means I need to remove the throttle cable.
Over the winter I will probably mould up a bespoke airbox, but time is short, so for now I will be altering the standard one. Again after a far bit of thought, I’ve come up with a solution…. hopefully a simple one.
Firstly I’ll simply blank off the front intake of the zx10 airbox, and remove the standard filter. While I was doing this I discovered that the previous owner had removed most of the filter element anyway.
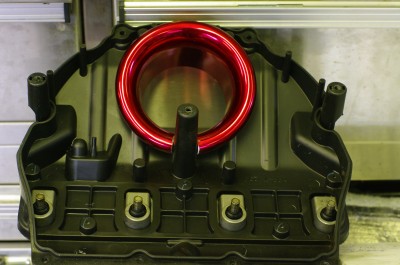
In order to feed air into the top of the box, I’ve cut a 85mm diameter hole in the top, and I’ve fitted in the red spun aluminium intake duct you can see in this picture of the inside of the airbox. I’ve mounted it on the inside of the box, so that there are some nice radius curves to help the air enter the airbox. It will be held in place by a liberal layer of polyurethane sealant.
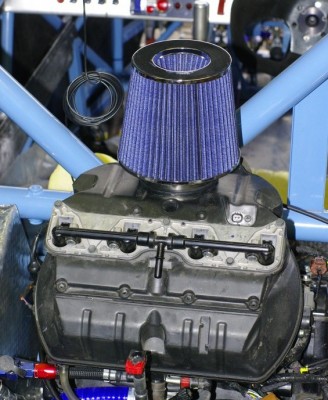
 Of course this means that there is no airfilter in the path. So the plan is to to fit a suitable sized conical filter to the tail of the red duct, on the outside of the airbox.
Here you can see it sitting on place on top of the airbox. I do think it is slightly comical and has something of the dragster about it though.
It should work ok, and I can feed cold air at it fairly efficiently via a hole in the main engine bodywork. But it is of course a stop gap before I build a proper one…. but I’m rapidly running our of time, so it will have to do.
There is one slighly concerning issue though. Because the engine sits slightly off centre, the filter foul the bodywork, because the bodywork engine cover is symmetrical about the centre line of the car, rather than the centre line of the engine. If that is the case then I may find a 45 degree elbow useful.
I mentioned earlier the extinguisher, well the last thing I managed to achieve today was to mount the extinguisher nozzles. The cockpit one was pretty straight forward, but the engine bay took some thinking about.
 There are no clear rules or guidelines in the MSA blue book, and I have previously pointed mine at the intake + fuel side of the engine. But if the point of the extinguisher is to protect me rather than the car, then there is a reasonable argument to point it at the exhaust side of the engine. In my experience it is usually the exhaust that ignites hot oil, ejected from the engine after a failure that causes small fires, and given that this would be directly behind my back I decided to mount the engine bay extinguisher nozzle here.Tomorrow, I’m eto finish the airbox & throttle, finish the extinguisher installation, put on the chain tensioners and finalise all the stuff to do with the exhaust, so that I can close off the panel behind my behind my back. That should pretty much finish the engine installation and leave me with the suspension to finish off, before I crack on with the bodywork.

