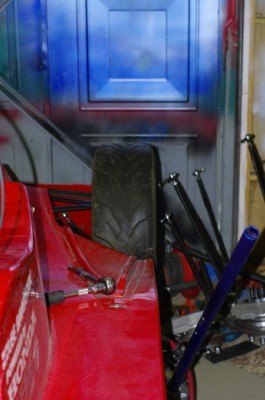
 Stop press. This car will move!…. well at least it would if I hitched it up onto its right hand side Dukes of Hazard (or if you’re under 40 Fast’n’ Furious) style, as it currently only has the right hand wheels. But, wheels it does have, as you can see from this rather dull shot of a tyre.
Andy phoned me last week, to let me know I could come and collect the suspension , uprights hubs and disks. This was somewhat quicker than expected, but it appeared Lee had had a nasty biff while testing his car and had written off his chassis courtesy of an errant classic mini driver who had tried to park his A series engine inside Lee’s cockpit. Lee thankfully wasn’t hurt, which is all credit to his Sabre’s chassis which has now sustained three massive hits all of which the driver walked away from. But like all good bodyguards the chassis put itself on the line to save the occupant and it was a write off.
However, because of the narrow angle of attack of the mini it had gone completely between the suspension units, and these were undamaged. Unfortunately Lee is out for the season awaiting a new chassis, so Andy has agreed with him that I’ll have the running gear, and Andy will sort him out when the new stuff arrives. At least that way one more Sabre gets out on track. So heartiest thanks to Lee for allowing me have his hardware… but hearty commiserations too for his run of bad luck. I did however feel a bit of a vulture stripping the wishbones off his bent chassis. ![]() . In addition Andy, poor chap was hobbling around with a duff back, so I hope you both get well soon.
. In addition Andy, poor chap was hobbling around with a duff back, so I hope you both get well soon.
So this left me with a full set of suspension for the four corners which should in theory bolt straight on to my chassis mounting points, and while I was there I also collected a couple of bits of additional bodywork, which I was awaiting.
Back home with the running gear, I made a mental list of what needed to be done to get the car rolling, well obviously I need all four wheels, but this is currently impossible as the car’s left hand side is tight up against the garage wall. So I elected to fit all the right hand gear first, then manouver the car around so I can concentrate on the left hand side and this will also allow me to access and fit the water radiator and coolant system which is the last major part that is missing in the engine bay.
To do this there were a few things on the to-do list. Namely; complete the side pod floor supports, fit the side panel, grind the powder coat of and reweld an incomplete joint (allways a pleasure GRRRR). Fit one last bit of cabling in the wiring loom for Lamda sensor, and then sort out all the dampers and push rods.
The floor supports came first and I used the simple approach system that I used on the old Genesis. Namely a thinwall 1/2″ steel tube, crimped in the vice to form a flat at each end, and then bent and drilled to the correct shape to support the floor at the right level. The floor was supported on a 2.5m spirit level to ensure it was lying flat and then these were just bolted to the threaded bosses that I welded into the chassis way back in March. Andy I know makes adjustable supports with a 6mm rod, threaded M5 at each end, and 2x M5 rose joints, I thought this looked like a lot of work, so we’ll go with my bent tube approach for now. As before it resulted in a pretty rigid installation, which will firm up even further when I fit and bond the bodywork parts to it.
Next onto the side panel, this is an incredibly thin, moulded GRP panel that fits the contours of the tubes at side of the space frame. It appears to have been made from a single layer of chopped stand matt bonded with less resin than I usually have clinging to the sides of the pot when I’ve finished my GRP moulding. Don’t get me wrong its perfectly made, and properly impregnated, just incredibly thin and light, and away from the car it’s quite floppy and in danger of tearing itself apart under its own weight if held horizontally. This is appropriate as its only real purpose is to keep the rain off me. The exterior bodywork itself does a good job of shielding the wheel arches, and as empirically proven by the Lee the main chassis tube is incredibly strong without the need for cladding it in Aluminium. Plus it would be a very difficult shape to do in ali anyway. On other cars Andy has previously bonded these panels in place with Tiger Seal, but on his advice, mine is just held on with a couple of self tapers, cable ties and some large head 1/8th rivets.
So on with mounting the wishbones, brakes and wheels…. starting at the back.

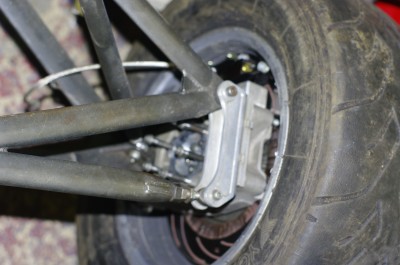
Unsurprisingly the wishbones just bolted on at the inboard end with no trouble, and the brake calliper bolted straight on at the outboard end. Here you can see that rear wishbone has a rear toe link, and a pushrod to drive the inboard suspension. Toe and camber are independently adjustable by shims and that toe link. You can also see the 6 drive studs which take the lobro CV joint.
However, when attempting to fit the wheel a few things became instantly apparent. The Wilwood powerlight handbrake mechanism will not fit under my 13 inch wheels, and the callipers just foul the interior of the wheel spokes when bolted up tight (1 or 2mm).
The first problem can be surmounted by removing the hand brake actuation arms, I’ll just have to come up with an inboard handbrake mechanism instead and I know Andy has a working prototype on Lee’s car anyway. The second has two potential solutions. The first is easy… wheel spacers. Lee was already running some thin ones, so I’ve fitted some slightly thicker ones to get the clearance. When choosing wheel spacers you should always choose the properly engineered ones with a central socket and spigot that properly engage with the central spigot on the hub, and the corresponding aperture on the wheel. This is important, because the spigots both centralise the wheel properly and transfer the car’s weight to the wheel’s centre. The bolts should really only provide additional clamping pressure and support, not the primary primary load bearing mechanism. I get mine from JJC racing on ebay, mainly because I can’t be arsed to do the two hours work per side that it would take to make them on the lathe.
The second possible option is of course to get some new wheels, these are my 6″ rims which where the largest allowed when I bought them. RGB now permits 7″ rims, so the obvious thing to do is buy a suitable sized set of 4 7″ rims, and use all my 6″ on the front, thus giving me a complete spare set of wheels and tyres.
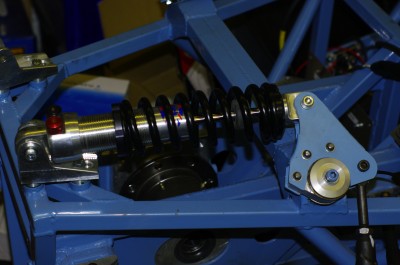
At the inboard end things required a bit more fettling, the aperture in the bell crank is quite narrow, and this was forcing the rear of the damper upwards, as the mounting eye bound up in the crank. The natural rest position for the damper was with its tail end about 1.5 inches in the air.
I could just about force the rear end down to the mounting bolt, but this is obviously undesirable from a suspension kinematics perspective, and would clearly side load the seals in the damper internals and damage them in short order too.
So I knocked up some little ali spacers on the lathe, and you can just see these under the rear suspension mounts. These raise the damper up and I think solve the problem, but I will need to check again once the car is on its wheels.
Talking of the Lathe, the more observant among you will notice that the damper is mounted with little M8 bolts, “but Dampers typically have 1/2 rose joints for mounting, they’ll be rattling about” I hear you say. Of course you’re perfectly right and it was necessary for me to stand at the lathe and knock out some little tapered spacers to both support the damper in the mounting slot and convert the bore to 8mm. This was also true of the other end of the damper and the pushrod extended rod end. Incidentally that seems a little loose, so I might have to take it back to Andy to get it re staked to tighten it up.

Anyway here’s a selection of yet more widgets that form the spacers, and represent about 40 minutes work. It doesn’t take long once you’ve sharpened the lathe tools and got the hang of it. These are just out of the oil blacking bath so are still nice and shiny.
Oil blacking, gives some degree of corrosion protection, and if your interested is easy to do for small parts.
Hang the widget from a wire and heat with a blowlamp until it reaches the blueish stage… then drop into your purpose built oil blacking bath. In my case an old bake bean tin filled with old engine oil.
Retire to a safe distance, or carry it outside while coughing like mad as it produces “a quantity” of white smoke.
Leave to cool in the oil.
Remove and admire the finish.
Oh and remember that the oil will also have been heated by the hot steel. So be careful when you move it. (ouch). I really must buy one of those home passivating kits some time.
Anyway next instalment…. the front suspension.

