Excuse the horrible pun, but today Duncan and I made significant progress, on two major components. The first is the electrical isolator and its associated wiring, that kills the whole car power supply, and the second is the main bulkhead /firewall which isolates the driver from the engine bay.
But before I get into the detail of that, I should announce that I’ve joined the twittering masses in the tweetomatic-o-sphere. My plan is to keep you up to date with the small updates on the Sabre and the mini, using my twitter account so follow me @RGBracer using the button on the right. Thanks must go to my old RGB buddy, Stuart Tanton (if you’re a die hard reader from way back you might remember him making a sudden appearance at the end of this movie). Stuart had registered RGBracer on Twitter, but as he wasn’t activily using it, he graciously passed it to me. Stuart is currently “between cars”, but I hope he’ll be back in the RGB paddock soon.
Anyway back to the Sabre. This was the first full day since, we got the Sabre back from Powder coat, and coincidentally also a RGB race meeting at Brands Hatch. Another meeting that we’re not at… so a little added impetus to get this beastie built. So we really cracked on.
As usual we adopted our normal distribution of labour, where we each play to our strengths. I got on with the the wiring and power supply, Duncan got on with fabricating the firewall. He’s way better at visualising stuff, and then making it and is an old school “measure twice and cut once” type of guy who cut his teeth building clinker built boats. Whereas I’m a logical thinker, who is very happy with circuit diagrams, but generally somewhat ham fisted. (All very typical traits considering I’m an IT Director).
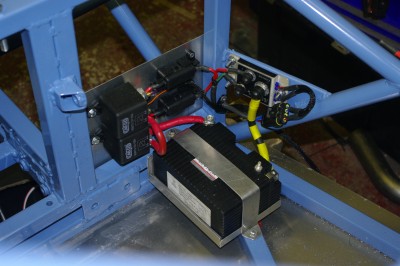
Anyway I spent the day making this little collection of parts and bits.
At the base is the new Shorai battery that weighs all of 700grams, sitting in a little foam lined ali tray, to the left are the main power relays which switch on the engine starter, and reverse motors. Also on this ali plate are the main system fuses, one which services all the ignition circuits, and the other which serves everything else. Lastly on the right hand side is the Cartek Isolator. I know Tim is pretty anti this little device, but what you see in this picture is the sum total of the high current battery cables in the entire car (excepting the drive cables to the motors which will also be ultra short). BTW the neutral line is marked with yellow flashes to comply with the blue book regulation. I think the idea is that in extremis, the marshals can cut it with bolt cutters and isolate the entire car.
I’m pleased to report that all of this worked perfectly, and it powered up the main fusebox properly, when I hit the start button the start relay fired, as did the reverse, as did the fuel pump one…. so the circuits that I’d installed so far all work fine ![]() and prompted a Dr Frankenstein tweet “ IT LIVES!” I’m going to crack on with the remainder of the car systems, before I put the engine in next week or so. One of the key areas is to decide is to layout the auxiliary switchgear, as I’m currently torn between using the bike control switches for things like lights and indicators… or fabricating my own panel. the former gives you a lot of lightweight switches in a small package, but is just a bit low rent. It is what I used in the Genesis though. Its one of a number of key ergonomic arrangements that requiren me to mould the seat very soon.
and prompted a Dr Frankenstein tweet “ IT LIVES!” I’m going to crack on with the remainder of the car systems, before I put the engine in next week or so. One of the key areas is to decide is to layout the auxiliary switchgear, as I’m currently torn between using the bike control switches for things like lights and indicators… or fabricating my own panel. the former gives you a lot of lightweight switches in a small package, but is just a bit low rent. It is what I used in the Genesis though. Its one of a number of key ergonomic arrangements that requiren me to mould the seat very soon.
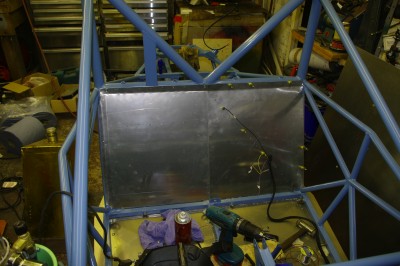
 Duncan by contrast, got on with installing the main firewall. We decided to make this in two parts, with the passenger side permananetly fixed with sealant and rivets, and the drivers side de-mountable to allow access to the exhaust headers and oil filter. I’ll still need to seal it, in order to comply with the blue requirements for a complete firewall… but access to the headers seems to be a very good idea, particularly as the floor plate is permanently fixed to the engine bay.
What are now the seatback panels actually drop down behnd the chassis rail at the base to help ensure that any fluids shed by the engine, like an oil leak, don’t find their way into the cockpit. I’ll also be sealing the engine bay tubes to the floor pan to help prevent leakage forwards. If you blow up this picture, you’ll notice how neat the lines are, how consistent the fitting around the welds, and the nice neat lines of equidistant spaced rivet/bolt holes. All of which is typical of Duncan’s work on panels. At the end of the day, we were nearly done…. I’ve just got a few more Rivnuts to set, and some firewall sealant to get and I can get on with deburring and finishing all this off.
Incidentally the sides are coverd by a thin, lightweight GRP panel, which I need to collect from Andy next week. Judging by the way the cockpit is filling up with swarf I also need to get a new garage vac/hoover. Also on the purchasing list is a full set of brake lines and master cylinders and vast number of button head bolts,and other sundry fixings for the main components.
Also I’ve ground off the powder coat and welded the invetiable joint that we missed. no pictures as welding a fformer powder coated joint inevitable resulted in something particularly ugly ![]() . Still at least the cellulose paint I got is a close match to the powdercoat.
. Still at least the cellulose paint I got is a close match to the powdercoat.
