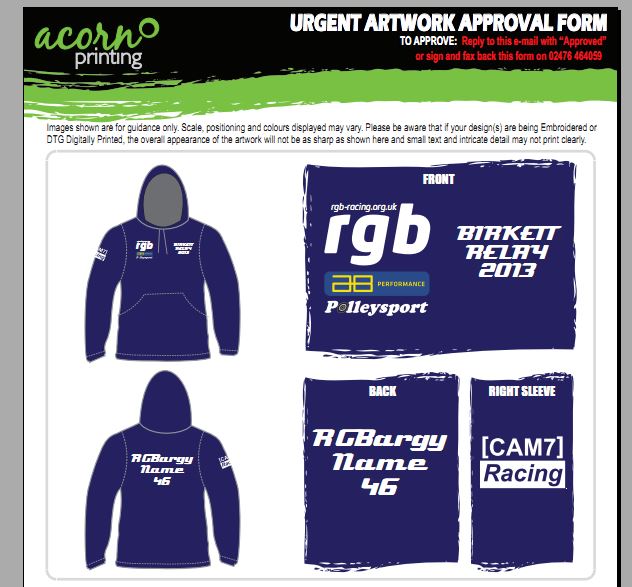
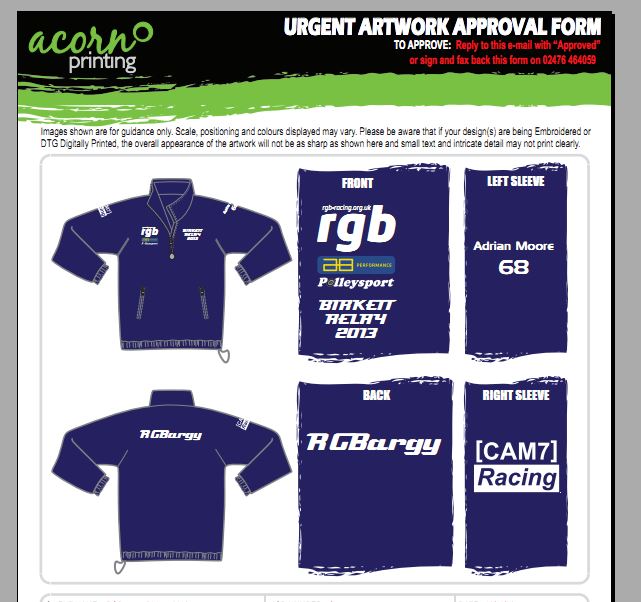
Birkett 2013 – Team wear announced

Frankly I’ve had a crap year in RGB, I’ve blown 2 engines, DNF’d nearly as many races as I have finished and ultimately I’m now doing an entire engine installation swap from a Kawasaki to a Honda in just 24 days. Why… because its time for the Birkett 2013 and no matter what I’m not missing that.

For this year’s Birkett, Team RGBargy have a new organising force in the form of Charlie’s pit babe Clare Atkinson… whose organised us into getting some team wear. So here are the proofs, from Acorn Printing, which happens to be run by fellow RGB Driver Duncan Horlor.   Top Service and good prices.

Hoody Fleece

Posted in AB Performance Sabre | Leave a comment

2013 RGB Season. First outing at Brands.

Due to the cancellation of the Donnington meeting, our first day back at school was at Brands Hatch.   I had been testing earlier in the week, and I have to say I had a great time.   As always the Sabre was working well dynamically, but unfortunately I was nowhere near the pace, however I was having fun.  I love Brands and have done more laps here than anywhere else… and I needed to have some fun in this car after the forced engine change earlier in the month.

I was getting quicker, and quicker and I tweaked the suspension to accommodate the surface changes at Brands.  Generally the car ran well, and I felt I was working the kinks out of it, and out of the systems around our running it.  Simple things like calibrating the fuel tank and base lining  the suspension settings, working out the fuel consumption and so on.  Not having these things done, really brought home to me that we really haven’t had enough trouble free running yet.

The only issue I had was that in the last session of the day she developed a high speed lack of power.  I couldn’t get her to rev above 11K rpm. discussion with various paddock mates suggested that perhaps it was the fuel map or power commander… none the less I couldn’t replicate it after the test day and only had three days before the race.  So I was a bit stuck from a troubleshooting perspective and simply had to take it to Brands, with my fingers crossed.

The other nagging problem was that the DL1 data logger was refusing to log for more than 30 seconds or so.  I spent some time with them on the phone and they suggested that I log the supply voltage as the logger was suggesting that the battery voltage was dropping too low.  This was to set a pattern, for the next few outings, where I never managed to get any useful data.

So on to the first RGB race of the year.  RGB did itself proud, with a massive entry that at one stage resulted in I think 5 reserves for the races.  Consequently the club re-jigged the timetable, and split the classes into separate races for Classes R and F.

Qualifying at Brands was a busy affair, but the high speed lack of power was getting troublingly worse.  I was faster than many around me in the bends, but simply getting mugged on the straights, by everyone.  Eventually I qualified third last in a time of 58.86… which is frankly crap.

During the gap between races we did some further troubleshooting, and decided to remove the power commander from the system and race on the original Kwaka map.  most of the day was spent in glorious sunshine, but just before the race the heavens opened.

I managed to get some video of the race.  The conditions having changed dramatically from practice we were given a green flag lap… Of course RGB cars and specifically the A048R tyres are pretty poor in the wet so two people promptly fell off on the first lap, causing a red flag.  Then uniquely in my experience we were given a second green flag lap to have another long hard look at the conditions, before the race restarted again.  And when it did  one or two of us promptly fell off again on the first lap.   The conditions were totally treacherous, and I had a bit of graceful spin myself.

I’ve managed to get some video… shown below… but it really doesn’t show how bad it was… I couldn’t see the nose of the car let alone the car in front or indeed the track.  Andy Grimm in the white BDN in front of me had a big moment at the second restart… apparently all he did was select second gear.

Also the engine wouldn’t now rev above 7.5K and would barely pull third gear… so the problem definitely wasn’t the power commander as it was now out of the circuit. So with conditions amongst the worst I’ve ever raced in, and engine problems meaning that I can’t compete, I elected not to risk te car any further and  retired to ponder the engine management problems.

Race 2 was due on the Sunday, and when we came to test the poor running problems, we couldn’t even get the car to start.  We spent four or five hours, swapping power commanders and ECUs,  even installing new sensors and trying my ECU on Tony’s car, and testing various different combinations… but to no avail.  After a frustrating day troubleshooting, when the guys got called to the race, we loaded the car onto the trailer and headed home as soon as the race finished.  So a weekend of 1 DNF and 1DNS…. not the best start to a season I’ve ever had.

Frustrating… but at least I bought the car home in 1 bit… which was lucky considering the Saturday conditions.   It seems we still haven’t worked the bugs out of this system yet.

Posted in AB Performance Sabre, Brands Hatch | Leave a comment

2013 RGB Season – Early Report

Ok I’ve been a bit lax on updates this year, so I thought I would consolidate a bunch updates into a series of reports for you.  The first half of the season has certainly been eventful.

With the mini done, I could now devote a couple of evenings to getting the Sabre ready for the new RGB Season… Essentially I was running at about 4 weeks behind schedule in preparing for the 2013 season, but I HAD kept my promise to Katie and finished the mini, which was the important thing.   Although I have made one stipulation in relation to the mini.  If anyone ever compliments the car she is obligated to smile and  say ” Yes, My lovely husband  restored her for me!”  …. apparently she says it a lot :-)

You’ll recall I had a fabulous time, at the Birkett in what was basically  a new car, with limited shake down testing, although I had curtailed the final session due to an odd high speed rumble which we thought was a failing CV joint. So I was keen to get out for some pre season testing with Snetterton with Tim and a few other RGBers  before the start of the season.  The idea was to conduct a proper shakedown, and start working on some speed and setup changes… which is something I didn’t manage at the Birkett.

I changed the CV joint.  One other thing that needed attention was the breather system.  At the Birkett it had chucked about a 0.25L of oil into the catch tank for every 10 minutes of running.  That’s clearly a bad thing. So there was  much discussion with Tony Gaunt and Bob Mortimer, who both run ZX10s in RGB as well.  Bob had the same problem, but Tony had a solution.  He basically suggested, that I cap off the internal ports to the exhaust for the PAIR valves in the Cam cover, then drill the hole below the recesses to make breather ports in the Cam Cover.  If you do it so they align with the CAM bearing covers, and refit the reeds and covers back then you basically make a new breather at the top end of the engine, that breaths out of the PAIR valves on the cam cover.

If you then also connect the engine breather to a catch tank, via a T piece, with a 1 way valve in the leg that goes to the bottom of the catch tank, and the other leg goes to the top, you’ve basically built a recirculating breather system that drains any oil spat out back into the sump.

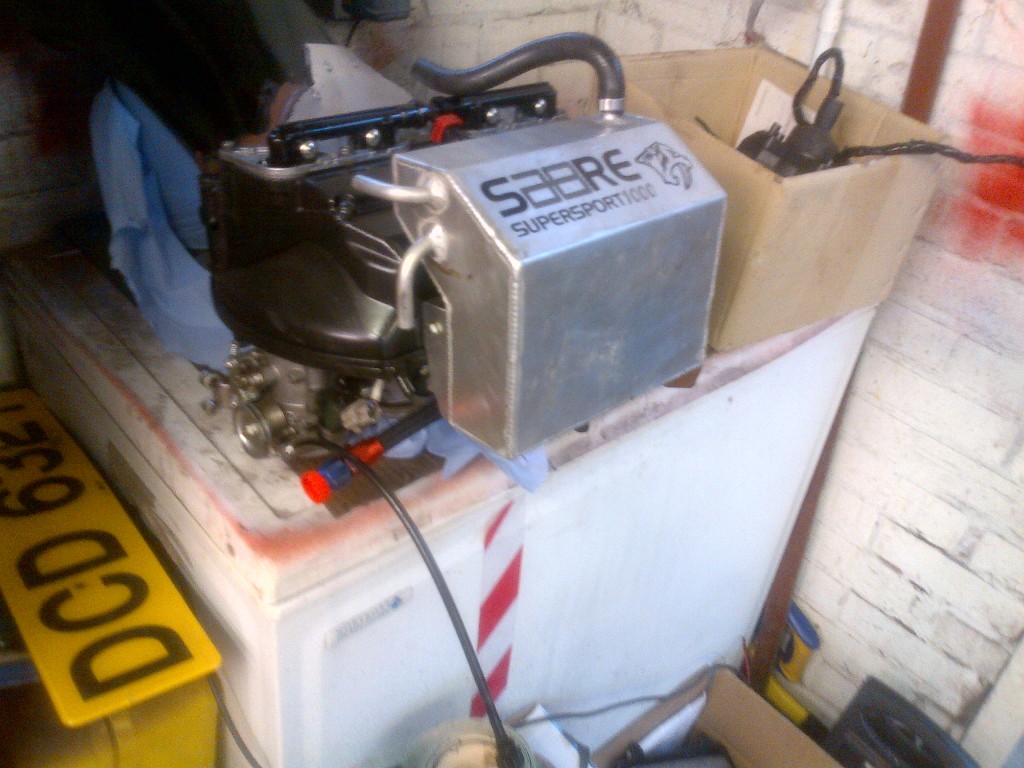
So I had a bespoke one made by Bryn over at Allyfab to fit the airbox, here’s a picture of the new catch tank in place , and it seems to  work Ok.  Thanks Tony.

Catch Tank

The other thing I wanted to do was to change the electrical cut off from the Cartek silicon type to the big flippin solenoid type, the Cartek one had had a problem or too, and on an RGB car where the reverse is a big electric motor, the voltage drop when I engaged reverse was enough to kill the whole car , as the isolator dropped out. Not a good scenario.

I basically built a monostable circuit to latch the solenoid, and allow a one button push on the outside to kill everything, and still allow me to use an aircraft switch cover for the internal  cut off toggle switch.   I prefer  aircraft covers as it allows me to kill the engine with a possibly inaccurate flail of a hand.

The actual changing of the cut off went OK, but afterwards she refused to run the fuel pump.Which is a sure sign of an ECU/Sensor fault.  However unlike the very sensible Honda systems which flash the warning lights at you in a certain sequence to tell you the fault, the Kwaka will only display the codes on the LCD of the bike clocks… which I didn’t have and which I couldn’t get in time for the test.  So I was basically reduced to doing a part by part test… and could I find the fault?  Could I hell as like!   Eventually in desperation I rigged up a fuel pump override switch , that at least allowed me to  run the engine.

It was about this time that she developed a horrendous misfire,  I just couldn’t get her to run on four cylinders.  It was now the Tuesday before the test day on the Friday and I was running out of time. So there followed many a long evening chasing the fault.  Swapping around parts and checking power commanders, and every thing else. Eventually I identified that no4 Exhaust wasn’t getting hot, and swapping of the stick coil, plugs and injectors between 3 and 4 didn’t move the problem.  So it had to be wiring to the coil or injector.  By now I was down to my last few strands of hair, having spent bloody hours chasing this fault, and was almost at the throwing spanners at the wall stage.   I pulled the ECU plugs, and check the continuity of all the relevant wires, and it all checked out!  S0 if the problem doesn’t move with the spark items, if the injectors, the plug, the stick coil and the wiring checks out then either the ECU is duff, or there’s a physical problem with the combustion chamber. Bugger don’t say she’s dropped a valve!

It was then that I noticed, that as I pushed the ECU plugs back on,  a small wire moved.   I gave it a gentle tug, and it came right out of the housing! I checked the wiring diagram and sure enough it was for Stick coil 4.  I extended the cable slightly to ensure it wasn’t under tension and reinserted it into the plug, and the plug into the ecu.   Hit the start button and bam she’s idling on 4 again .  Brilliant!  She still won’t run the fuel pump, but is running well enough to go testing. and with a whole 6 hours to spare!

Thanks goodness for that.

So off we went to Snetterton for a bit of pre season testing and my first outing on the new 300 layout. Despite the lack of prep time I was pretty confident of getting a some good seat time after the success of the Birkett;  dynamically she was good, and despite the nagging doubts the engine seems to be running well.  Sadly it wasn’t to be.

The test day dawned extremely wet, so when the track opened I went out for some tentative laps.  So I was on lap 2 and  just starting to lean on it a very tiny bit.  I was just putting the power down after the new hairpin  called Agostini on the infield section.  When Bam! Something breaks and I’m pitched into the infield grass where I do a few graceful pirouettes on the wet grass!  Once I get her collected, I make it back to the track, but its clear that something is very wrong at the back left corner, as the arse is all over the  place, and she is virtually un-drivable even at walking pace.  So I pull up at the Marshall’s post just past Oggies.   I tried to get her out of the way but unfortunately the session is re flagged.  I hate red flagging a test day for the other drivers… Hate It!.

I suspected that the left rear toe-link had failed, and this meant that the LR wheel was pointing in random directions, which had pitched me into the infield, and accounted for the “Wicked Shimmy” at walking pace.  This was confirmed as the car was lifted up onto the flat bed and carted back to the paddock.  At least I had a nice chat to the Marshall.

Once in the paddock, the cause of the failure became obvious.  The  left rear toe link has indeed sheared all the way through.   It was a concentric top hat adjuster made from a 7\16 bolt.  With a 7/1 6 thread on the outside, going into the end of the wishbone, it was drilled with a 3/8 LH thread on the inside, going all the way through.  The toe link male rose joint goes into to  the 3/8 LH thread to connect the wishbone to the upright, and because of the LH and RH threads you get more or less toe, by twiddling the central adjuster, and both ends have lock nuts to pinch it all in place.

These are perfectly sensible adjusters to have on a race car.  Provided the rose joint male section goes all the way through the top hat concentric adjuster, and extends into the wishbone.    If this happens then there is a ‘solid’ steel connection between the wish bone and the rose joint, as despite the various threads, in cross section there  is metal all the way through the joint.  Unfortunately on my installation the 3/8 rose joint, stopped exactly in line with the end of the wishbone, which meant that there was an air gap in the middle of the joint, right at the point of maximum stress,  and the wheel toe control was relying on a really thin cylinder of steel which was threaded on both sides.  Of course if you then  tighten up the lock nut you then stress this flimsy cylinder of steel even further.

So with the stress plane passing directly at the end of the wishbone, I guess it was not surprise that it failed…. the lucky thing was that it pitched me into the infield onto the grass, rather than into the  Armco… or worse still didn’t do it 30 seconds later when I was doing 100+Mph down the Revett/Bentley straight.   I’ve decided to look on the bright side.

Still all that being said I obviously had broken car on Lap 2 of an expensive test day.  So I hopped into a taxi and headed over to AB Performance for a spare.  The new G2 cars use a different arrangement and Andy didn’t have a pre-made spare… so we nicked the unit off Derek Jones’s Sabre… (Thanks Mate) and I headed back to the circuit.

I had the car rebuilt and realigned in time for the first session after lunch,  the track was now drying and I felt it was time to bang some laps in.

Unfortunately, This was not to be, 1.5 laps in , again at the Agostini hairpin.  I got oil warning lights… I literally had time to think   ” OIL ! What the DUCK?”.. and then the engine sized. and I was stranded at the same Marshall’s post again, we’re quite good friends now!  Although this time I didn’t red flag the session…. It was red flagged because of a three ring circus of paddock marquees was being blown across the track in the high winds.

So that was it.  Two sessions each 1.5 laps long. One ended with broken suspension, and one ended with a broken engine.  Not the best day I’ve ever had in a racing car… so I lobbed it on the trailer and slunk off home with my tail between my legs.

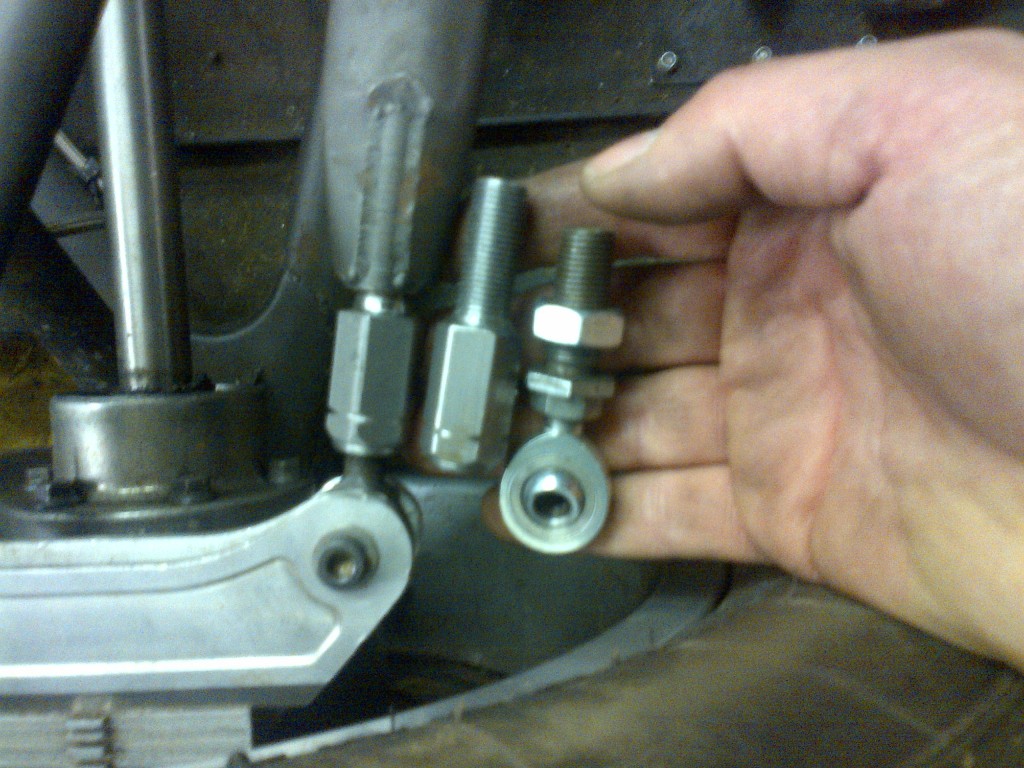
While hunting for a new engine I spent some time at the lathe reinventing the rear toe link,  On both sides the concentric adjuster “installs” to not have much meat in the wishbone, and after my infield excursion at Snetterton, I clearly wanted to rectify this. So I made these.

New Toe Link
New Toe Link

The old one is on the right and the new version is test fitted (I later fitted the locknuts).  The new version isn’t hollow all the way through the middle, the large hex section is internally threaded for the rose joint, but solid well before the transition to the external thread that goes into the wishbone.  It is obviously longer than the original, so we cut back the threaded bosses in the wishbone by about 10mm.  But there is at least an inch of thread inside the wishbone , so plenty safe enough. You can see that there is a smooth transition at the shoulder to avoid stress raisers at that transition too.

So with the Brands Hatch RGB season opener approaching,  I needed a new engine, unfortunately the long wet winter meant that  very few bikers had been out playing on their superbikes, consequently they had been few accidents, and therefore there were few engines available.  but eventually I did manage to find one.

It is a sad fact of club motorsport with bike engines that our engine supply comes from bikes that are being broken up, usually after some accident damage.  My fervent hope is that nobody was hurt to supply my engines, and the former owner was safe in a pub, when his bike was hit while parked up, by some errant car.

I have opened up the old engine, and it is basically full of bits of bearing shell, and the crank is blued and scored… so it is properly dead.   The good news is that it just pinched on the crank, and didn’t throw a rod… so is eminently repairable… I just need a new crank.

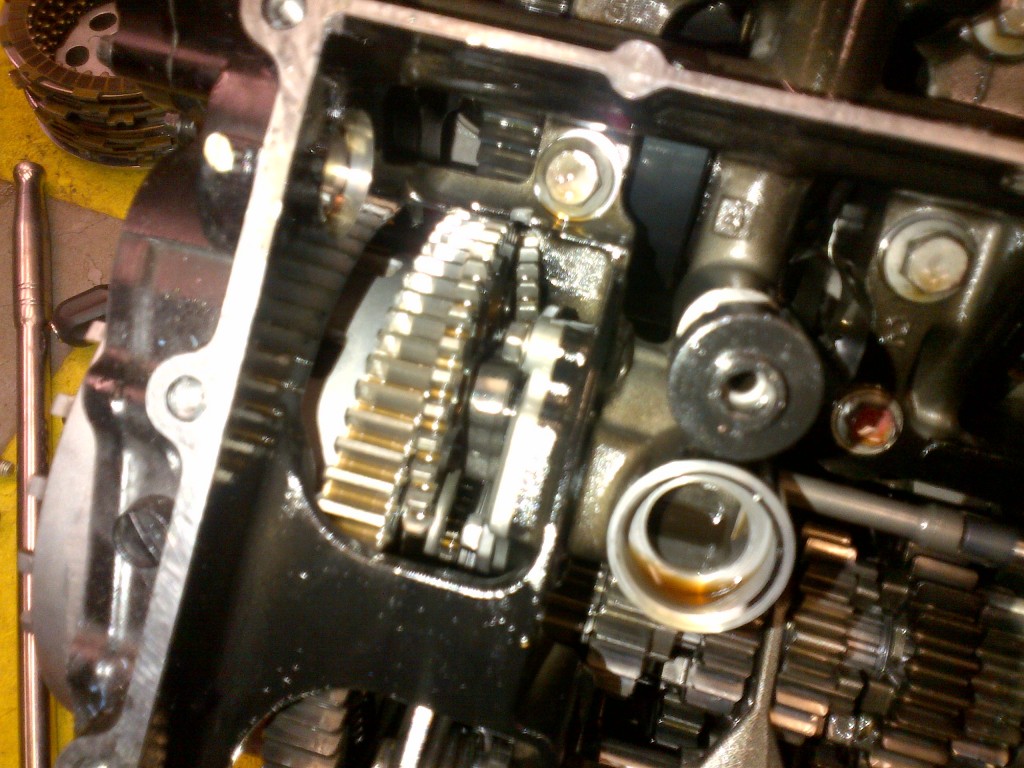
But why did it fail? I’ve opened it up, and this (apart from a million little gold bits of bearing shell) is what I found.

Broken Oil pump drive

Broken Oil pump drive

On the left of this picture is the clutch basket with the big wide gear teeth on it, next to is is a much thinner gear … this is the oil pump drive, that is driven off a small gear hub in the centre of the clutch basket.  Now if you look above the oil pimp drive you can see a small gear at an odd angle.   This is actually part of the oil pump gear wheel.  It’s a 60 degree segment which has broken  entirely out of the oil pump drive gear.  What appears to have happened is the oil pump drive gear broke, the broken bit was swept around with the remains of the main cog, and then it all jammed solid, dropping the oil pressure to zero instantly.   But why did it break?   We also found this

Broken Clutch Rivet

Broken Clutch Rivet

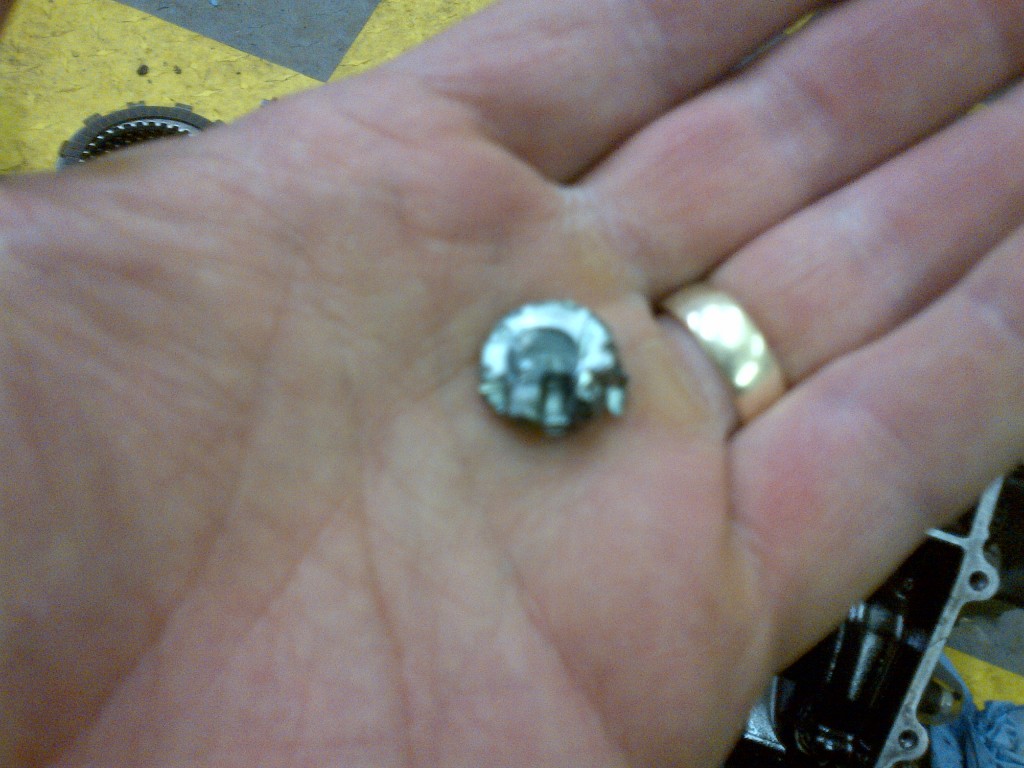
This is the back of one of the  steel rivets that hold the clutch basket to the gear wheel you can see in the picture above.  The indentations on it clearly match the gear teeth of the oil pump drive.  So the chain of events looks to be  clutch basket rivet fails,  it goes through the oil pump drive gears, breaking them as it goes… the gears all jam up. dropping oil pressure to zero instantly, the lights came on, I failed to kill the engine quickly enough, and she seized.  Remember that odd high speed vibration at the Birkett?  I bet it was the clutch basket failing, rather than the Cv joint, hindsight is as they say an exact science.

Of course if I’d killed it as soon as the lights came on, maybe, just maybe I could have saved the engine. :-( ! Of course, with a dead engine I was entreated to ditch the ZX10 and go for the more normal CBR1000 engine… problem is it is so damn expensive to change circa 4K.

The first actual race of the season was due at Brands hatch, so we cracked on and got the new engine in , and got the beastie aligned and corner weighted.

So I went testing at Brands. the Monday before the meeting.  More in the next instalment.


Posted in 1275GT mini, AB Performance Sabre, Engine, Suspension | Leave a comment

The Mini is Finished :-)

Sorry, this is a long over view post…. I’ve no excuses, except the mad panic to finish the mini continued until Valentine’s day, and consequently the time to get the Sabre prep’d for the season was compressed into just a few weeks, and then I’ve had a less than smooth start to the season (more of which later).   I’ve spent most evening in the garages up until just a couple of weeks, so I’m afraid I’ve consequently got very badly behind with the blog.  And you know how it is  once you get behind, it gets progressively harder to catch up.

Still I’m here now, and so here are a few highlights of the last few month’s work.

Firstly let’s talk about the 1275GT mini.    I failed dismally to get her sorted for the New year, because as you may recall I was waiting for a delayed replacement cylinder head.  but this arrived from Swiftune around the end of January and I could finally fit the engine.  and build her up for her MOT.   The head went on beautifully, and I even managed not screw up the new primary clutch bearing for the second time, by boring it with the cross slide on the lathe at about a 6 degree angle from the centre line, which gives you about a 10:1 ratio of motion and very very fine control when you are trying to sneak up on a highly accurate dimension.  (Thanks to Tubal Cain on you tube for that tip).

So I’m very please to report that she passed her MOT at the first attempt :-) and Katie has been driving her around since Valentines day.  For once I kept my promise to her.  The Grin she wears every time she drives it makes it all worth while.  She loves the fact that the 1275GT is so unusual, and turns heads and gets waves from other mini owners wherever she goes.

Here’s a few shots of the finished article.

Here’s one of the chassis tag I had made up for her.

And of course here’ the big bow moment.

and here’s the two ugly buggers who did all the work.

After she’d got a couple of hundred miles on her, I took her to see Pete Baldwin,renowned  Mini historic racer who’s basically won everything, and who also runs a renowned rolling road in Cambridge.

So having had a head that’s basically 1275GT – S Pack specification, and a swift tune SW5 Cam fitted I was pretty keen to see what she would make on the rollers.

IMG-20130214-00024

Now bear in mind a stock 1275GT produces 59 BHP and a stock MK3 Cooper S produces 79 BHP… I’m very pleased to say she produces 88 BHP!  But far better she has fantastic tractability… she’ll pull third from low 2000 rpm and does it with just a fantastic deep growl… she’ll then spin through the range, and the note hardens up to howl to give peak power at about 5.5K.   I chatted to Pete, and he said we’d done exactly the right thing by keeping the twin 1 1/4 carbs rather than going larger… it keeps the airspeed up at low revs and that’s what is giving you the tractability.   So if you want a fast road mini that growls & screams.  Is a pussy cat when driven sensibly in town, is tractable low down and flies at the top end.  Here’s your  recipe.  She is all I could have hoped for. :-)

Incidentally the first thing the mechanic in the garage yard asked  me when I drew in was “Ohh nice… is it a genuine 12754GT?”….. Damn right is it!

  • Stock 1275 GT. not over bored
  • Swiftune SW5 Cam.
  • Big valve head.  inlet and exhausts.
  • RC40 Exhaust.
  • Twin 1 and 1/4 SUs fitted with K&Ns

Post script.  After a couple of month of living with her, it’s become apparent that she is burning oil, and will need re ringing or over boreding.  (It was the only thing we didn’t do as the rings gapped up OK, and the bores were pristine)  Synchromesh is also failing on No2…   but you fix that by simply managing the change with a heel toe. So I guess I know what I’ll bee doing next winter.

Still none of that matters right now.  She is great fun to drive, and makes my wife smile every time she drive her!   Its been a two year labour of love.

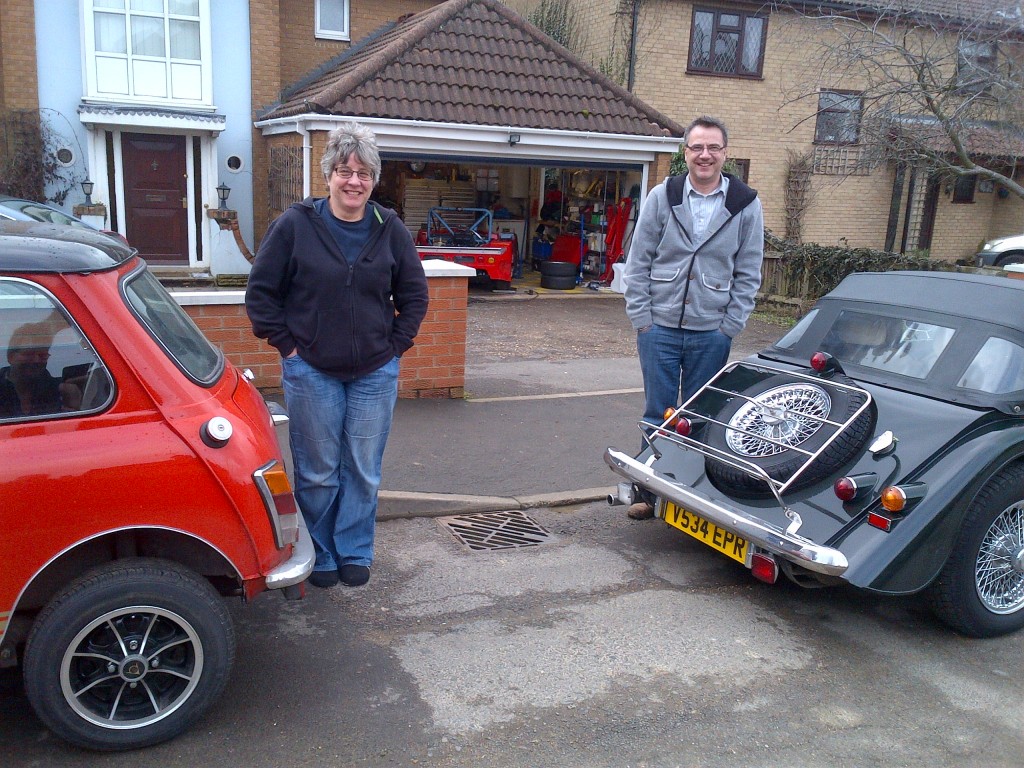
One last picture.   this is Kate and our friend Tim… who has just sold his Paul Smith mini to buy a Morgan.   They are standing by their toy cars, and mine is in the garage behind!

IMG-20130310-00031

Posted in 1275GT mini | Leave a comment

Mini Progress…. Well major progress really :-)

So what’s been going on since the Birkett?

Those of you that have been following the Sabre build may have noticed along the way that there was a  mini clubman loitering in the background.  Sometime’s loved,  sometimes waiting, but it’s been there all along, and been getting sporadic attention as we panic fettled  the Sabre to get ready for the Birkett.   Well now that that is all done.. It was time to get on with the mini.

For those that don’t know it’s a 1979 1275GT, with about 40K on the clock, and two genuine lady owners (more of that later).  It’s exactly the same model and year as the car my wife had when I met her, but we sold that when the Kids came along.  They’re now grown as it’s our Silver Wedding this year (god that makes me feel old)… so it was time to get another one for her.

I’ve been doing all the metal work over the last couple of years and refurbishing all the running gear, but now it was time for the “final push” to get it ready for Katie.  So I took the bold decision to stick the Sabre in storage, where she lurks now, patiently awaiting the start of the new RGB season in 2013.   That gave me loads of room in the garage, so the mini could take centre stage.

Not many pictures of this bit, as it’s a bit dull but there followed a few odds and sods of welding to finish off the metal work.  Then I took her to my local garage, for a quick MOT style check and when she was pronounced “Sound as a Pound”, Duncan and I grinned and then trailered her off to the paintshop to have some colour chucked at her.

Here’s the big moment.  ”Dr Charlie” departing  on the trailer,  that’s  two years of  hard work (On and off)  sitting on that trailer.
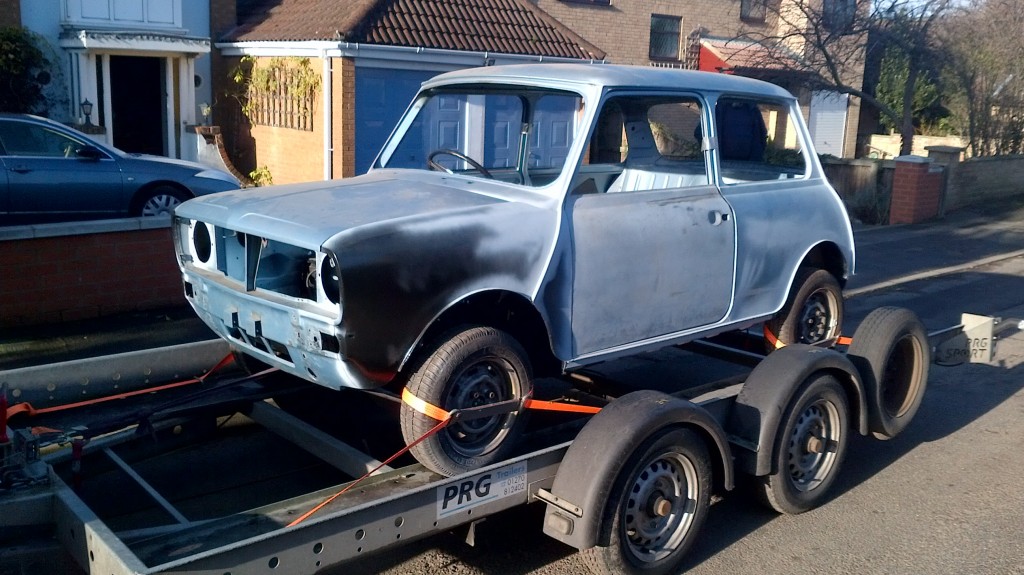
Dr Charlie' heading off for paint

I got her back last Friday….  Colin over at the paint shop had posed me a conundrum… “Do you want it in the original Denim Blue…. it’s a metallic and  means that we have to do a base coat and lacquer…. which is very hard to repair, what about a standard mini colour?  What colour do you want?”   Well obviously given the choice, and that the whole point of this car is to recapture the glories of yesteryear, there is only one choice  the original colour and a black roof.  It turns out the the original colour of the old one was Cinnabar Red!

Kate wasn’t aware of this and I was hoping to surprise her…. that plan lasted precisely 2 hours, until she found the invoice on the kitchen table.

Well enough of all that, what you really want is a picture right?
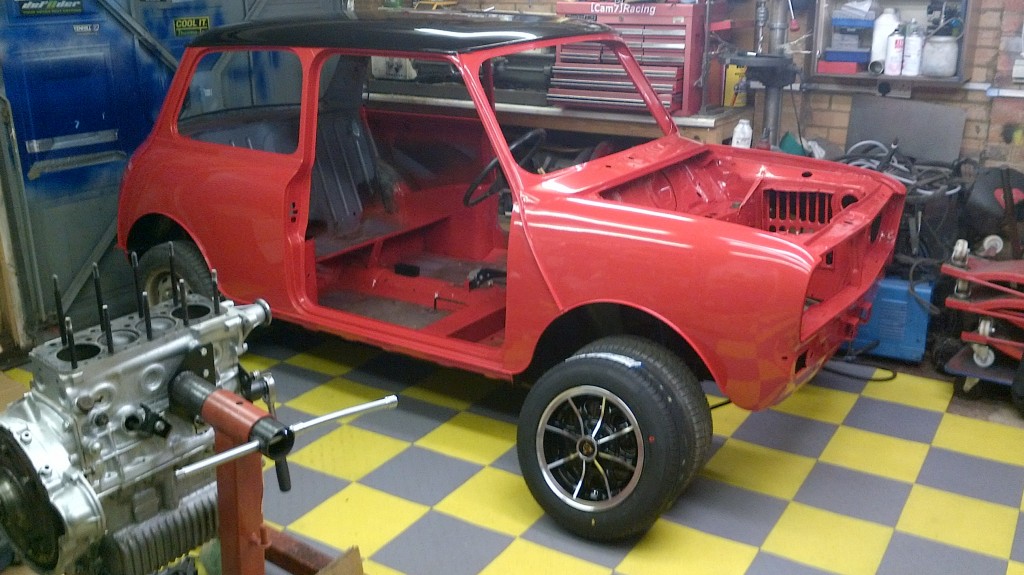
IMG_00000033

Here she is in Cinnabar Red , with a jet black roof, just like the old one :-) .   The doors, bonnet and boot are still at the paint shop, I’ll pick them up on Monday.  The paint code is CMT (BLVC399), and is actually much more reddy/orange than reddy/pink in the flesh.  It’s a lovely colour, and I’m actually considering painting the Sabre the same colour.  The colour is age appropriate, although about 1 year later than 1979, and I think it looks great… it will be even better once it gets the gold stripes on it. :-) .   There’s a couple of other things to note in this photo… the spiffy new garage floor tiles and the nearly completely refurbished 1275GT A-Series engine… I’ll talk about that in a minute, and again the age appropriate Dunlop D1 alloys.  These are modern equivalents, because you can’t get the originals for love nor money, and in fact I’m not sure I’d want to fit 35 year old alloys anyway.  The other thing you can see is my engine stand with a bespoke A-series mount, holding the engine.  Unbelievably this mounts to just the oil filter and alternator mounts, but it does hold the whole block very successfully and allow you to rotate it around, to access each end and even invert it completely, to get to the gearbox.
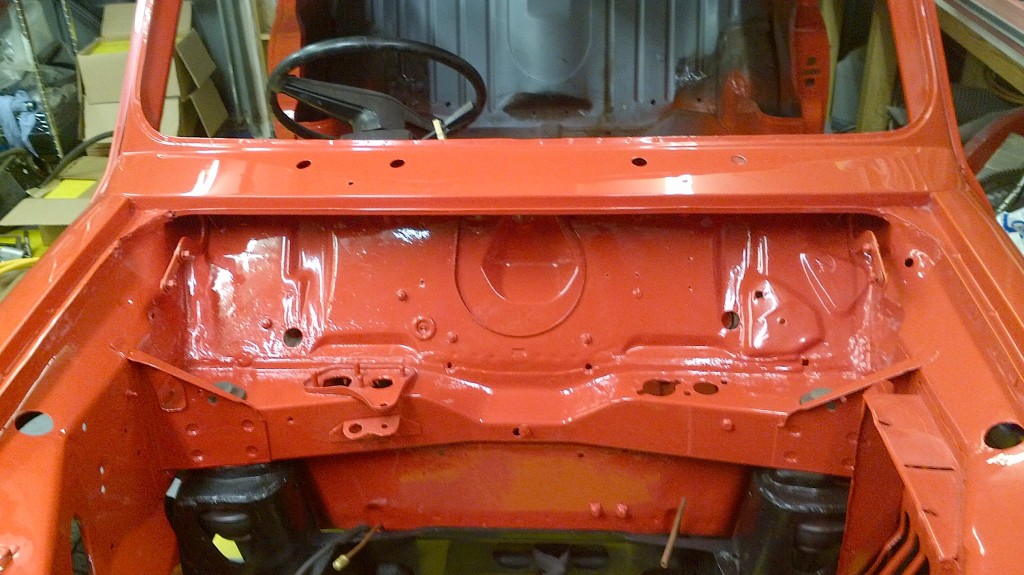
IMG_00000030

The car went off for paint about three weeks ago,  so in the interim, I’ve been sorting the engine.  As usual this started with “just give it a clean” and drop it back in mindset.   But as you start to disassemble it, you find one or two things that need sorting, and eventually end up rebuilding the whole damn thing.

First up was cleaning, cleaning and more cleaning, before you even consider opening an engine it must be clean on the outside, so that the grot doesn’t fall on the inside…. so I went the whole hog, and cleaned and painted the block, in silver.

I thought long and hard before I even opened the engine, but as Tim and Duncan both said 80% of the work is actually getting the engine out and clean…. it’s not much more effort to spilt the gearbox off the bottom, and inspect the main bearings, the big ends, and the cam.  The same applied to to popping the cylinder head off and checking the valves & bores.

Now remember, I said this car had had two genuine lady owners, well the last of which has used the car very very little for the last 10 years, and we have MOT certificates to prove that 200 miles per year since the turn of the century was not unusual. We know that the last lady owner basically used it every now and then to drive around the corner to the shops.  I can hear the engineering minded of you all thinking… “Slow speed, infrequent journeys, never warming up properly and probably lack of oil changes is bad!”       And indeed it was, really quite bad.

First I cracked off the main and big end bearings… all the mains were fine, but No 4 big end was scoring, it was both discoloured and lightly grooved.
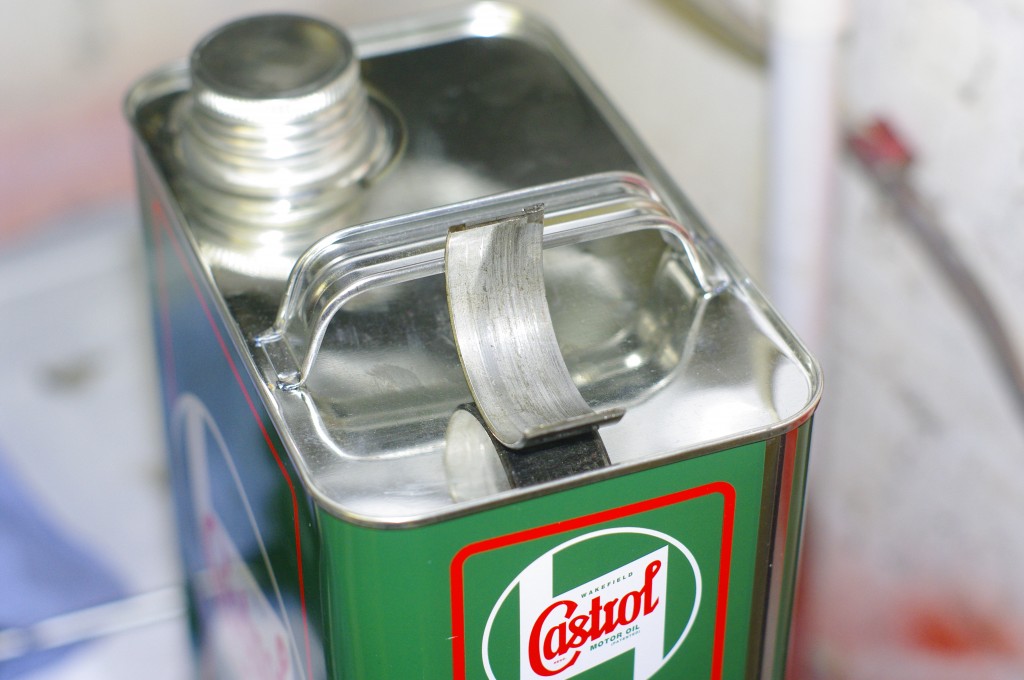
_IGP8820

Fortunately the big end pin  itself looked mostly ok with only some mild marking and discolouration, and my micrometer said it was very close to the design tolerance, and mostly round.  Nonetheless off it went to Lyndale engines for a grind or polish as necessary.  It only took a week, and came back polished, and still at nominal standard size.  Which is great, as we plan to keep this beast for a long time, so having a crank with at least one or two more grinds left in it is great for the long term.  It looks like checking the bearings was a great idea, as we caught this failure just in time. Here’s the block awaiting it’s re-installation.  That’s not strawberry jam… it’s assembly lube, and those are all new bearings, including heavy duty big ends.
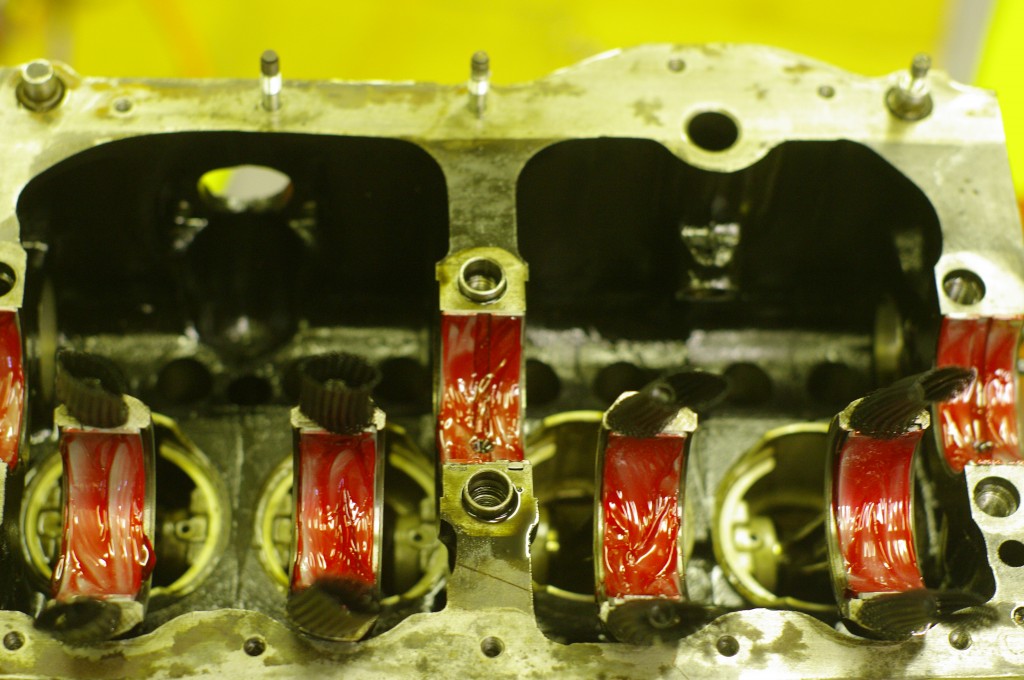
_IGP8817While the Crank was away my attention passed to the camshaft and its followers.  Here you can really see the damage done by lots of small journeys
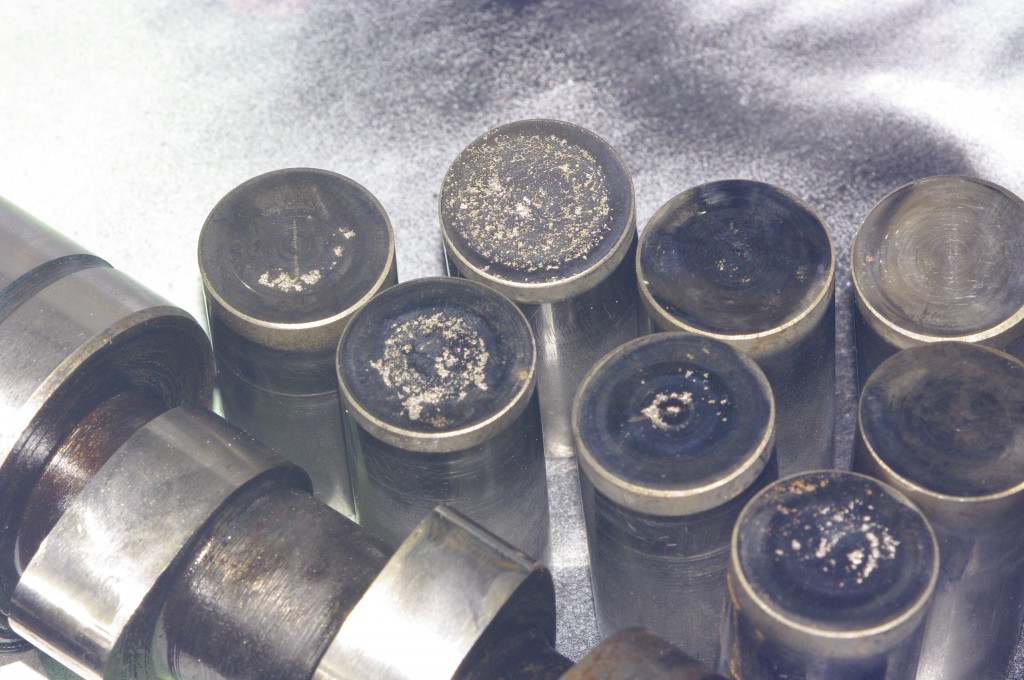
Very worn A-Series cam + followers

Very worn A-Series cam + followers

The damage to the followers is obvious, but if you look at the cam lobes you can also see the damage to the corners of the lobes.  So a new cam was required.   This is all because of the infrequent short journeys…. so If you have a mini you love… don’t just drive it to the shops once a month.   Get in it, get out on the road and DRIVE it, and change the oil… often.

So it needed a new cam, and what to do, standard or a warm fast road cam?   The big mistake most people make is to go for a race cam, or very high end,  high performance road unit.  On the public highway we mostly we drive road cars in the 2000-5000rpm range, and we’re interesting in cornering well, sweet acceleration, and flexibility…. not ultimate speed.  Even in race cars you’re only in the top 10% of the RPM range for 60% -70% of the lap, so fitting a peaky race cam which only works in the 4800-6000 range in a road car is a very bad idea… the engine is lumpy and the drive very unsatisfying around town… overall it’s horrible… which is the precise opposite to what I want to achieve, which is a car that makes me grin every time I drive it.

Race cams make large BHP, but at the expense of low down torque and smooth idle.  What you need in a road car is torque and smooth power delivery  IN THE USABLE RANGE! Never over cam a road car, slightly more than standard is great… any more than that is a pain.

Enter Leyland Special tuning and Swiftune.    When the 1275GT was launched in 71 (I think), it was to replace the Mini Cooper S MkIII, possibly the most loved sporting mini of all time.  The 1275GT was based on roughly the same block (without the tappet chest covers), but the Cooper had a sportier cam,  higher compression ratio pistons, larger valve head and twin carbs, to name the main differences which affected the performance.  Essentially the 1275GT was a detuned Cooper S.   The rumour has always been that Austin wanted to stop paying John Cooper the royalty he earned on every car sold that bore his name.  Odd then that in the 80′s rover instituted a new age of Coopers.

Anyway to cut a long storey short, such was the public demand for the now discontinued Cooper S MK III.  Leyland Special Tuning… (the guys that produced those famous Monte Carlo winning minis) produced a specification for converting a 1275GT engine  to perform similarly to a 1275 Cooper S lump.  And thanks to the wonders of the internet you can see the full specification here.

http://www.delius.pwp.blueyonder.co.uk/1275gt/tuning/cakd5096/front.htm.

So as I had to change the cam  anyway, it seemed sensible to get an age appropriate one or something similar to the Leyland ST one, and in the end I opted for the Swiftune SW5 cam from Nick over at http://www.Swiftune.co.uk.    Nick also recommended that I replace the feeble and badly worn, simplex timing chain with a duplex unit, as this would make it a “Fit and Forget” option, and crucially make it easy to time in the cam, as it was a vernier adjustment set.  Of course as the camshaft also drives the oil pump, a new cam means a new new oil pump too.  Again no bad thing.

Here it is all coming together and being “timed in”,well actually this is me checking TDC as the sharp eyed of you will spot that the camshaft pulley locktab is already in place.  The cam should run at 106-108 deg after top dead centre, at maximum lift on No 1 inlet, I think we got it bang on at 107.  You can also see the block deck is in very good condition with no pitting, and the new water pump is also fitted.
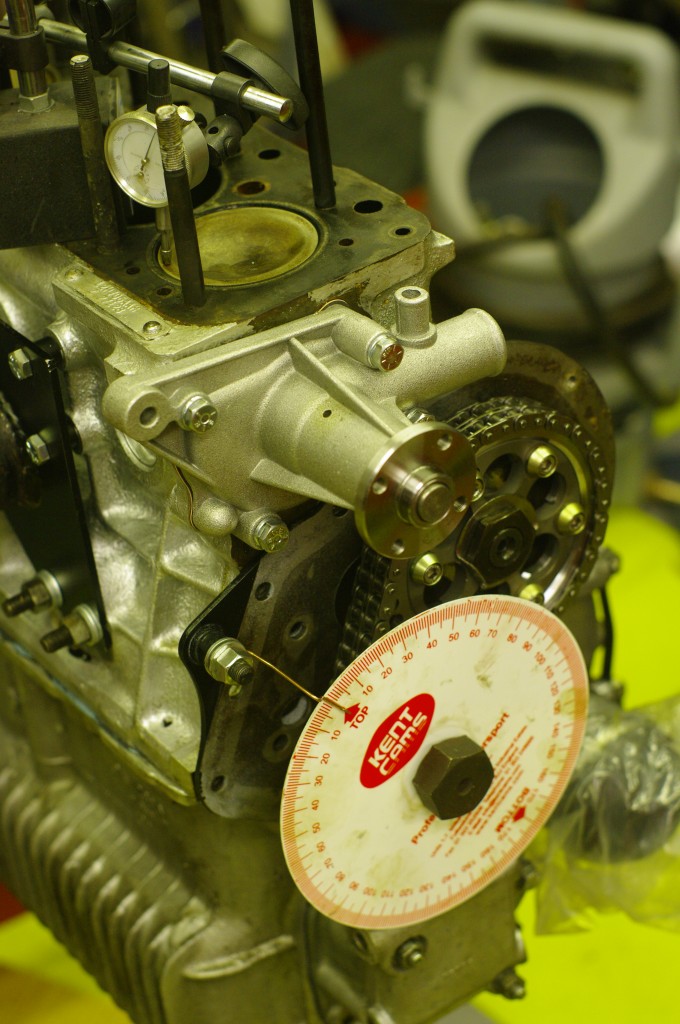
Timing in the Swiftune SW5 cam

Timing in the Swiftune SW5 cam

If you squint behind the timing disk you can see the new pot drive shaft joints still in their plastic bags, which bear witness that I’ve also changed the Pot joints, the old ones fell apart when we took the engine out, and I’ve changed both the diff seal output shaft seals, and the selector shaft seal.  I’ve even added the recommended O ring seal behind the selector shaft to try and keep this A series oil tight and continent for more than the first 50 miles.

So that’s the bottom end sorted out. now for the top end.  No pictures of this bit I’m afraid.  Basically following the normal Haynes procedure I dropped all the valves out… .Remember that this is a 1970s head designed for leaded 4 star fuel, it wasn’t surprising to see that the exhausts were all badly burned, as it has been run on unleaded for 15 odd years, and the seats were already on their way to being eroded.  So Nick Swift at Swiftune has kindly agreed to fit the unleaded valve seats I need.  I can’t do this, as like grinding a crank it is a machine shop job.  He normally only does  ”full on”  race engines so I was pleased to get such an experienced engine builder to do the head work on a road car.  It must be Christmas  :-).

New valve seats means of course that they have to be cut to the valve sizes… so it would be churlish not to fit the Cooper S inlets and exhausts wouldn’t it  (Back to age appropriate Leyland ST spec tuning).  Nick is also going to skim the head slightly to drive up the compression ratio, fit new guides, and shim the double springs.

So that’s probably going to take a couple of weeks, and my plans for finishing this car over the Christmas holidays are in disarray, but hey “Do we want it quick, or do we want it right”.

That brings me to the clutch.  I’ve  a new standard three part kit to be fitted… but before I can do that I need to sort out the primary gear.
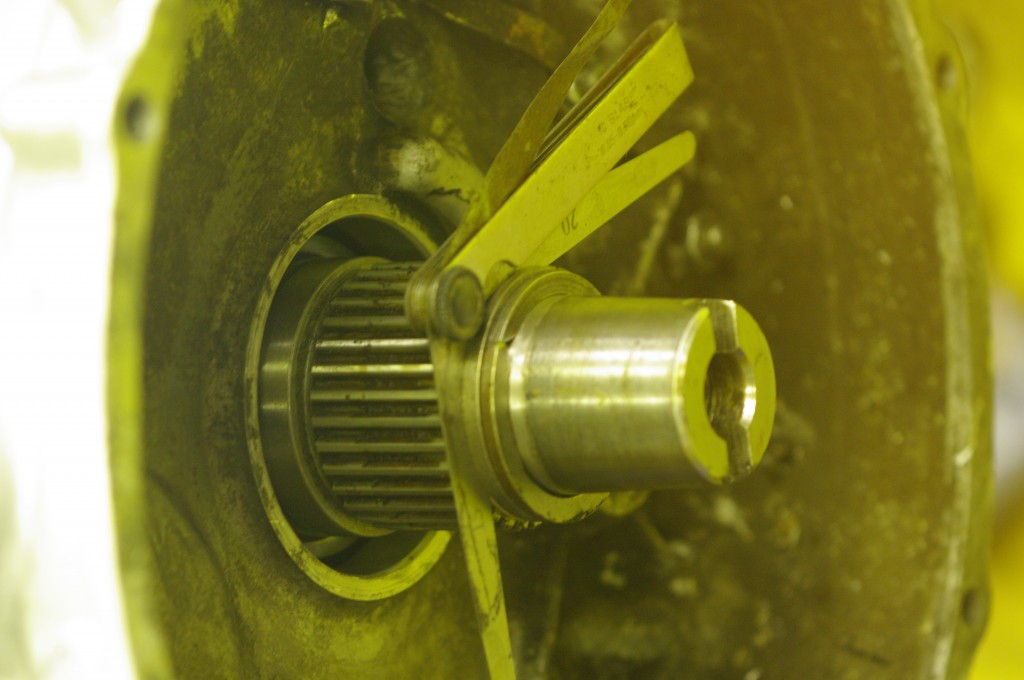
_IGP8825

The primary gear transmits the drive from the clutch, via the transfer gears to the gearbox.  Because of the limited space it runs co-axially around the crankshaft, and actually runs on the crankshaft nose, but it only rotates with the crankshaft when the clutch is out.   When the clutch is in the primary gear and gearbox stays “still” or more exactly rotates at the speed of the wheels,  and the crankshaft rotates within it at engine speed. That means the primary gear needs to run on bearings, or more exactly bronze bushes. You can see it here behind the feeler gauges, and in front of them is the “C ” washer and backing disk that lock into to the slots on the crank shaft to hold it in place.

The feeler gauges are measuring the end float.. which is the free gap between the primary gear and its mounts.  It should be between 0.08 and 0.16mm…. There’s .45mm of feeler gauges currently in that gap.  So I need a new brass shim to fit behind the gear to close the gap and the correct tolerance.  Problem is, I’ve measured the one I’ve already got and it is already the largest available, so that must mean the C washer is worn.  So I’m waiting on a new one.  The end float, if it’s excessive causes crunched gear changes, and if it’s too tight the clutch doesn’t release, or the primary gear sticks on the crankshaft.
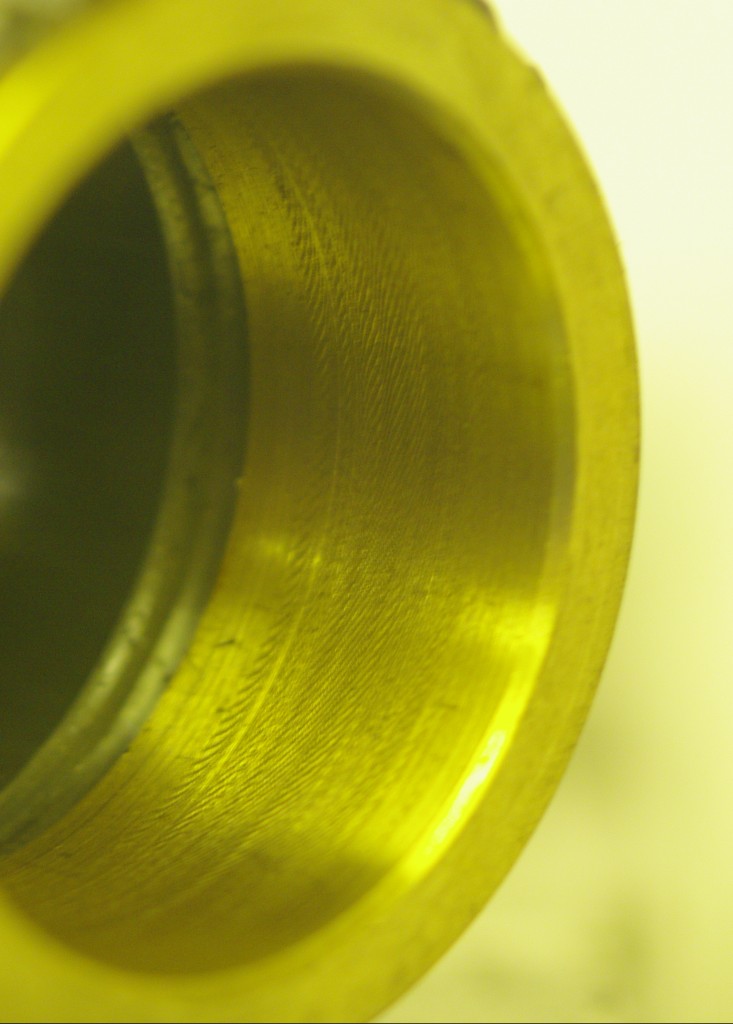
_IGP8828

The other thing about the primary gear is that it runs on concentric bronze bushes,  these need to a 0.1mm running fit on the crankshaft,  the front is ok, but old rear one was badly scored by burrs on the C washer slot, (Which also indicate that it may be worn).  The bushes are cheap and easy to replace, but after you’ve pressed the new in, you need to machine and ream it to size.  38.2 mm in my case.    So I spent a “pleasant hour” setting it all up perfectly concentric in my four jaw chuck on the lathe, and then bored it to size. I was coming up on the size , when my last cut chattered…. you can see the chatter marks on the bore.  These proved impossible to hone out, without it going .15mm over size, so I’m waiting on a replacement part for that too, so I can have another go… and I’ll use my old one to perfect my boring tecnique..

The other thing I’m waiting on, is a speedo cable.  I already have one, in fact it was the first part I ever bought for this mini, but it, it seems is the very early type and the treads aren’t the same.

So currently I’m waiting on various parts before I can fit the engine… it looks like she won’t run until mid January now.

So to finish on a positive note, here’s the clutch cover all clean, prepped and painted.  The rocker cover, breathers, and timing cover have all received similar treatment. Just the radiator, shroud and one or two other bits and bobs to go.  Then the engine is done.
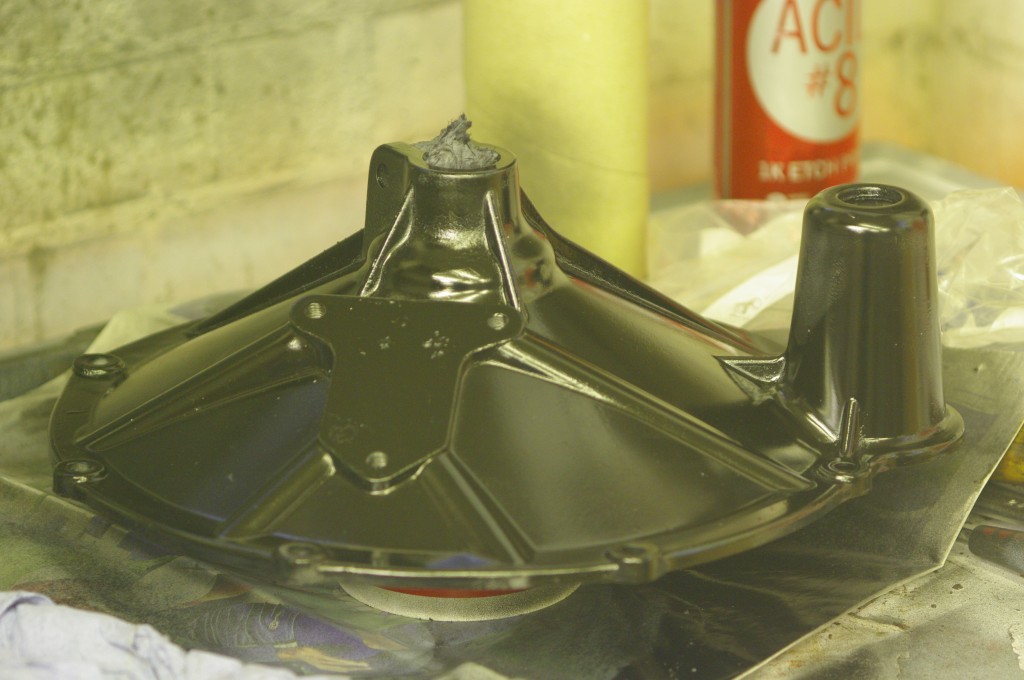
_IGP8829


Posted in 1275GT mini | 1 Comment

The New Generation 2 Sabre

The new Generation 2 Sabre’s are starting to arrive over at AB Performance. Andy’s spent well over 18 months getting the chassis, and build to an extremely high quality of production excellence in this entirely new evolution of the car.  For those of you who’ve followed my amateur, year long, build of the last of the G1 Sabre’s you can now see how a pro does it. http://www.facebook.com/#!/abperformanceltd.

Problem is…. I really want one, and mine only has 35 Laps on it!  Bad Adrian,  BAD Adrian!.


Posted in AB Performance Sabre | Leave a comment

750MC 2012 Birkett 6 Hour Endurance Race.

The morning of the Birkett dawned cold, but dry, with blues skies and bright sunshine… just the way we like it. :-)

The previous day’s testing confirmed that the car should hold together, so I was hopeful of not letting the side down.

I had some new soft tyres on order, and we fitted these to the rims between qualification and the race.  Talking of qualification, with close to 300 cars to get their 3 laps in, it is always a busy affair, the format changes from year to year. Some years you get three laps only, some you get a continuous open period, and some (like this year) you get a 20 minute slot.  I was second out, and decided to use my 20 minute slot as a supplementary test session, and eke the very most out of it.

With the front floor now stable due to the previous nights group fettling session, and the back end so much more planted with the rear floor now in place, I was having a ball… so much so I was severely disappointed to see the checkered flag, marking the end of the session.  As I pulled in the garage Andy asked me “How was that?”.  ”Well my lines were crap, my gear changes clunky, and I’m rusty as hell… but other than that it was brilliant” :-) .

The car was transformed with the front and rear grip in closer balance. She was still a little bouncy on the front dampers, so we added another click, and in fast corners she was wallowing a little in roll… So we tweaked the front and rear roll resistance, by stiffening both roll bars to try and keep her a bit flatter.   We moved them a very small amount (about 4mm at each end).  But other than that the only problems were that high speed, but low frequency vibration and a wing mirror that was a bit loose and had drooped.

One other thing I noticed was that I was now pushing harder in the corners, and carrying more speed onto the straights, but she wasn’t accelerating like an RGB car should. An RGB car should jump like a scalded cat when you hit the loud pedal, Cinders was more “easing”  up through the gears.   It is probably a combination of  a  tall main sprocket ratio, the heavy drag from the rear gurney at full height, a lack of tuning on the fuel map, and me not ragging the nuts from the engine just yet.    She just wasn’t quick enough down the straights, and this was illustrated by Austin passing me like the wind halfway down the Hanger Straight later in the day.

We made one other modification before the race, I commented to my lad  Chris that I needed some padding on the central pillar to protect my left knee, as the hard point was rubbing on the bone and very uncomfortable,  he disappeared and 30 seconds later he was back with a butchered car wash sponge and a roll of duct tape to make me some impromptu  but vital padding to aid my driver  comfort…. top paddock  fettling son :-) !

During qualifying Cinders had of course, spat about half a litre of oil into the catch tank, so I emptied that and added some extra to the engine, but once we’d done that and filled the fuel tank we were ready to go.  I’d been allocated the second stint, so that meant I had to be sitting in the “Ready 5″ position as the front of the garage, while Derek started the race, from grid slot 8.  Just in case he had a mishap or curtailed his stint, last year a tin top wiped the front corner off his Fury on about lap 10 I seem to recall…. this year he was also in an AB Performance Sabre.

Ready 5  is both an exciting and lonely place.  You have to be ready to go at a press of the start button, so you’re fully suited and booted, helmeted and strapped in.  Which means you’re awash adrenalin and  lost with your thoughts inside your helmet, usually for at least 30 minutes. I’m mostly  preoccupied with watching the guys on the Pitwall count down the laps on the previous car’s stint, and keeping my self calm.  In this case I was following Derek, who is also in a Sabre, but also in a different world of talent when compared to me.  Derek started 8th… and in my 30 minute wait I was kept updated on his progress.  7th,6th 5th….4th.  3rd… For goodness sake.. how can I follow that! Well done sir  2:14 round Silverstone GP circuit in a RGB car is awesome.

I forget to mention, in the time between practise and the race I fitted my new Contour Roam camera.  I hadn’t had time to do it before and could only find one suitable place which was on the front scuttle.  As a consequence you can’t see my hands I’m afraid… and it all looks far too easy and in fact a bit slow.  But here’s a video of the first stint.   Its the first viable video I’ve ever had from a Birkett… although you may want to mute the sound as it is mostly wind noise.

Almost immediately after had left the garage there was  a safety car session… I’ve cut most of this out of the video, but you do see my perfectly timed restart taking the place from a sister RGB car immediately after the start finish line… followed by another few minutes of frenetic running or so.  With regards to the restart the SC board and waved yellows are withdrawn at the start finish line, and replaced with waved green flags.  These then “ripple” from marshall post to marshall post in both directions around the circuit, so as I was going around Luffield I saw the Safety Car boards had been withdrawn and the waved greens emerging…  this means I can accelerate to race pace, provided I didn’t overtake before the start finish line.  So I dropped back a bit to get a run on Dave Watson  in front and was very pleased with the timing :-)

I didn’t disgrace myself despite a slightly over keen spin at Copse, on not quite yet hot tyres… and when I came in we’d dropped down to 8th (which wasn’t bad allowing for the other cars also doing relay changes), and this is where we pretty much remained for the rest of the day. Overall I was about 10 seconds a lap behind the other guys in the team, which for an unproven car is pretty good, there is much to come.

I did have a nice little battle chasing down a pretty little Lotus 20 , but lack of pace on the straights was hurting my ability to keep up, although I was matching him easily in the corners.  The other thing that became readily apparent was the complete lack of steering lock, due to the orientation of the lower spherical bearings, as it currently stands I don’t think I’d get around the hairpin at Mallory…. something else to look at over the winter.

Unfortunately in my second stint that nagging low frequency vibration was getting much worse, so I curtailed it after 6 laps or so… which was the first of three  unplanned changes in the team as me, Tim and Dan all had to curtail our stints, but good old Derek went out again and brought us home to the checkered flag in 8th place overall, but  not before the bright blue skies turned grey and dumped some hail on the competing cars.  Thankfully by then I was back in the Garage.

We suspect the vibration is due to that CV joint I had to rebuild in the week before the Birkett,  Andy has already supplied a replacement so it will get changed over the winter.

The full results are here http://www.750mc.co.uk/images/uploaded/2012%20Birkett%206%20Hour%20Relay.pdf, and as always we acquitted ourselves creditably on  the road  (known as the ”scratch” position).  We were 8th, just 8 laps down on the leaders, as our handicap gave us just 7 credit laps,  collectively we drove to our handicap.  Of course the Birkett trophy was won by a team who exceeded their handicap by a significant margin  (15 laps I think)  which would be almost impossible for us to do.

Still we all went home very happy, and with cars in one piece, unfortunately our RGB buddy John G took his car home in pieces after something apparently broke  halfway down the back straight, and it pitched him into the wall.. Thankfully John is ok… but the car is a mess which was a shame for him after a such great day for everyone up to that point.

Overall the Birkett was brilliant fun, full of incident and excitement as always.   And I now have a long list of small tweeks before the start of next season.  but first I am going to finish that 1275GT mini.

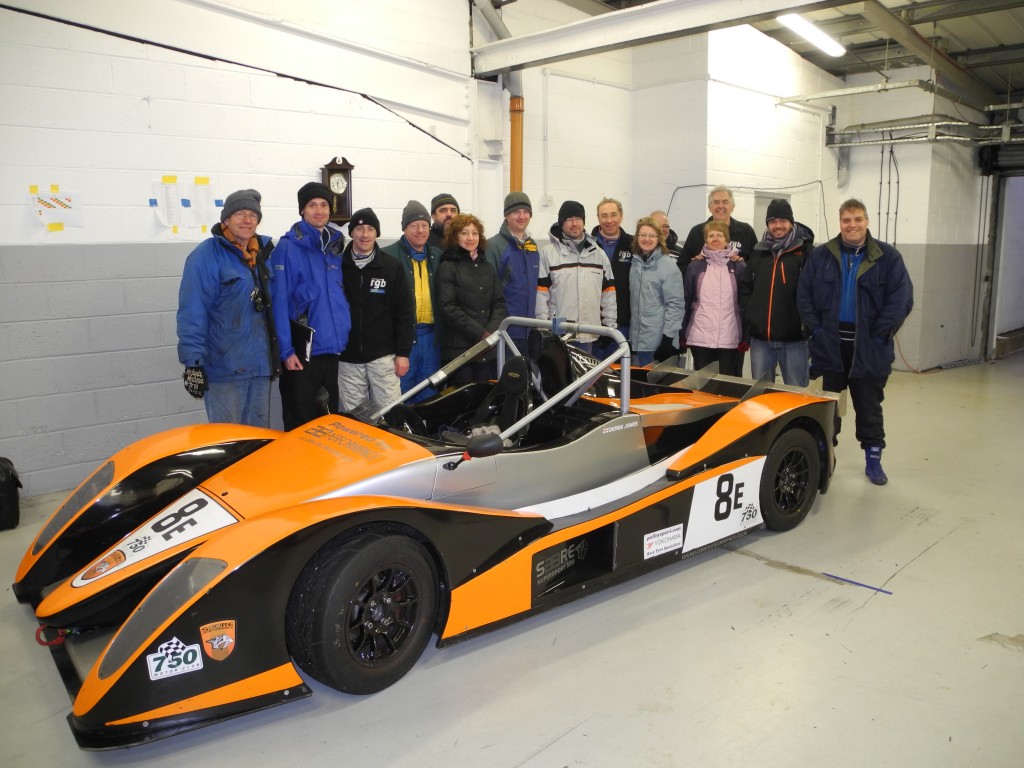
here’s the team photo.

From left to right, John Shaw (spanners), Dave Hacket (Pitwall), Derek Jones (Driver), Colin Chapman (Driver) and his wife Dominique with Duncan Mepham (My Spanner Man) behind.   Then Jonathan Roberts (Team Manager), Matt Newton (Pit Wall), David Wale (Driver) and his wife Sue, Rob Ellis (Garage), Tim Hoverd (Driver) and his wife Anthea, Hugh Robinson (Garage and Pit wall) and then Me grinning like a gimp and wishing I’d worn my RGB fleece like the other drivers, and my son Chris is behind the camera.

The Car is Derek’s AB Performance Sabre with some interesting aero mods on the back which I may just have to emulate if it will allow me to do 2:14 laps of Silverstone GP Circuit(If only it was that easy :-)  )

Posted in AB Performance Sabre, Birkett | Leave a comment

The 2012 750 Motor Club Birkett 6 Hour Handicap Relay – Pre Race test.

Well we made it to the Birkett.  The road has been long and arduous, and the pathway is strewn with my broken promises about finishing my wife’s 1979 1275gt mini about which I feel very guilty… But  here we are..we’ve made it :-) . and the Mini will get done before the spring!

For those of you who I haven’t bored to death about the Birkett, it bears a little explanation.  It is a 6 hour, team endurance relay race, which any closed wheel race car of any vintage can enter.  This means you get massive  differences in machinery , so it is also run as a handicap race   In the past we’ve had Radicals, racing RGB cars, racing Citroen 2CVs and classic Jags.  What this means is that in practice, there are 60 cars of loads of different types on the track at any one time, 6o teams in the garages, you’ve four or five team mates in the garage with you (along with their cars)  and a large number of mates helping out.  It’s an all day endurance event, but because your handicap is based on your best ever lap you have to drive your stints 1oo% balls out for the whole 6 hours, and minimise mechanical mishaps if you’re going to win.

It makes you feel like a proper racing driver.  On the track you typically get a couple of stints out on the track and it is one long overtaking fest, as you try and catch the classic mini, while overtaking a classic jag, avoiding the MR2  and keeping an eye out on the bewinged Radical bearing down on you at 150 Mph…. it is simply great fun.   go and Youtube  ”Birkett”… for some great footage. So that has been my aim to get in this most thrilling of races with this new car, it is I think either my 5th or 6th year of attending.

However… you do really want a well tested and reliable car before you mix it up in this company.

So after the  aborted Snetterton test, I still had a load of work to do to get this car race legal and compliant with the Blue book regs.  The important thing is that test days are non scrutineered, so you can cut the odd corner (like lights)  but races are properly scrutineered, so I had to get the car right before heading to the Birkett consequently, another day from work was required, and I cracked on with the essentials.

  • Front lights
  • Emergency Labels (Tow, Extinguisher, Cut off etc)
  • Indicators
  • Numbers + Letters + Race backgrounds
  • Fit rear floor.
Of these the two most time consuming were do the front lights and rear floor.  The lights were essential as the Birkett is often a bit gloomy, and the rear floor was a critical bit of kit to balance the down force on the car, and help stick the back end down.
The lights took all of Wednesday night and Thursday morning, and while I started the floor, I never managed to finish it before I ran out of time. So it was a good job that Andy Bates was bringing me a spare from his AB Performance workshop, unfortunately he couldn’t arrive until the evening before the race, which meant I had most of the day’s testing to complete, without the aero benefits of a rear diffuser.  Hey ho… we can drive around that.
So Duncan and I arrived on Thursday night ready for the Friday test about 11:pm, to be met with a warm welcome from my RGB mates.  It really was great to be back, even better the Sabre was earning some admiring remarks.  Even better still my lad Christopher had managed to make it home from university, and was about to experience his first Birkett from the pitwall, it really was great to have him in the paddock.

The Friday test  dawned, a bit damp, but generally dry and my nerves had me up at about 6:30

Before venturing out onto the track, It made sense to at least drive it around about a bit, Silverstone is blessed with a large wide expanse of tarmac known as “The old runway”, and I spent a good twenty minutes driving around in circles and figures of eight, checking steering, feel and alignment, going up and down the gears and generally just checking the basics work.  She stopped, she goes, the gears work and so on.

Most gratifyingly she was working well, the steering was aligning well, but the wheel wasn’t quite level with the straight ahead position, which Duncan and I corrected before the first practice. She also had an odd clonk  from the front right when coming on the brakes at low speed.  We checked everything, but in the end decided it must have been a worn rose joint, or the disk just moving a little on the studs, as we checked everything else and it was tight.

Session 1

So out we went in session 1 of 3.   The first couple of laps were very tentative, but generally she was going ok.

There were a long list of small teething problems. She was pretty tail happy, but very grippy at the front,  She was bouncing around a bit under braking and the brake balance was all over the place. The nose leapt up a couple of times when I came off the brakes.  We also has some  odd  vibrations at medium to high speed…. one which was clearly bodywork or front floor flapping around and a second lower pitched vibration that was related to speed…only kicking in along the straights.

Eventually the session was red flagged when someone dumped it in the Gravel.. so I came in and we made a few changes.

We raised rear gurney flap to aid rear grip, adjusted both bump and rebound damping to quieten the front down under braking and at brake release.

After the red flag I went out again and pushed a bit harder.  I had one excursion across the grass, when I went for an apex, but didn’t think the tin top I was over taking had seen me, so deliberately opted for the grass.  The handling was better, and I was dialing the brake balance progressively forwards until I got it somewhere close to where it needed to be.

However I curtailed the session after 1 lap as she was kicking out  white smoke in the exhaust, and I caught a flash of flame in the mirrors.   On inspection, there was oil in the engine bay, and oddly in the battery tray too….. there are no oil components over that side of the engine so it was very odd.  This  led me to the to airbox fluid drain which was  full of oil. And the final diagnosis was that engine breather from the gearbox was flooding the intakes with oil mist inside the airbox, and this was  altering the  engine fuelling, and burning it in the exhaust.

We disassembled  the airbox, and it was indeed swimming, so we mopped out the oil.   The fundamental problem is that I followed the bike’s standard breathing circuit, and connected the gearbox breather to the airbox. This is normal on the bike installation and works effectively…. but of course in our installation and particularly at Silverstone we are at full throttle much more than the normal road bike, and this clearly overwhelms the breathing system and actively sucks oil up the breather to the airbox.

As a stop gap we simply rereouted the breathing system directly to a catch tank, and topped up the engine and cleaned the spilt oil out from the engine. The catch tanks was the traditional 2 Ltr drinks bottle taped into the engine bay, and Tim Kindly donated a length of hose to allow the breather to reach it.

In session 2 the damper changes have helped a bit and the raised Gurney have added rear grip.  However, this time the session was curtailed by a red flag after only a couple of laps and as I came into the pit lane Duncan waved me into the garage.   The front floor had indeed been flapping around and had torn one of the mounts out of the floor where it connected it to the front bodywork.  As a consequence the floor had been rubbing on the tarmac, and had been gently machined to a sloping taper.  I clearly couldn’t go out again like that… so we broke out the fibreglass supplies,  (Scrounged from Austin’s dad Ken) Duncan glassed up the reapir and I made  up a reinforcing plate to rivet on  and support the the fibreglass while it went off.

Session 3.

In session 3 I did about 6 laps.  I still had a front floor vibration and that odd low frequency one at speed that had stuck around since the first session, but the car was definitely starting to come to me and feel like an RGB car.  It was really missing the rear undertray… but generally I could start to lean on her now.. and start to work the brakes hard as she was mostly stable under braking. The only other thing was the gear lever rest position was moving towards me which meant that the threaded  actuating rod\turn buckle was unscrewing.. so we attacked that with some thread lock in the absence of an additional left hand locknut.

There then followed as typical RGB evening when everyone helped me sort out the new car. Andy turned up with the new rear floor, so I set about fitting that.

At the front we still  to fix the front floor vibration and make it rigid so it didn’t flap about.

Initially we looked at  simply adding bulk and weight to the ply to stiffen it.  but when Derek Jones and John Shaw (my AB Performance stable mates)  turned up they quickly identified that we’d failed to tie the floor to the bodywork effectively.  The floor has a horizontal “return” edge, and what I’d failed to notice is that this should hook under a transverse lipped section which runs across the front of the floor itself. This locks the two components together and stiffens the whole structure mightily.  It was John who noticed this, an he set about cutting some interlocking bits from a piece of old Genesis floor that I’d been carrying around in the Winnebago for 3 years.  That he did this using a metal hacksaw blade, without a frame because we didn’t have a wood saw is a testament to his generous nature, great skills and dedication to getting another Sabre out on the Grid.  Once he and Duncan had finished the 20 or so trial fits necessary for this to work, we were about 80% there.  But even with this new horizontal lip\brace the floor still needed some corner braces to fully stiffen it up.

Enter Matt Newton a CAM7 mate, who was heading over to Silverstone from Cambridge, and passing (ish) my house on the way. So he very kindly dropped in to my garage and picked up a couple of tools, my Rivnut tools and some lightweight tube.

So in the best RGB tradition at midnight before the big race, we were fashioning some front floor braces from some thin wall fuel tube, and a bit of old Genesis floor, using the skills and good wishes of half the RGB paddock, a big hammer and some handy Silverstone structural steel pillars to use as an anvil and flatten the tube ends.  As always I owe my thanks to John and Derek, Andy, Austin, Ken, Tim, Bob, Matt, Dan and many others, these folks are all owed big favours from me and I’m pretty sure they’ll get paid back in similar, but reversed circumstances in the future.

That really is the joy of the RGB paddock… no quarter given on the track… no effort spared to help out if you need it in the paddock.

So at 1:15am  and after precisely 8 laps of testing of the car, and my only 8 laps of seat time since last year’s Birkett we were ready for longest, most taxing, potentially most dangerous motor race of the year… what could possibly go wrong?


Posted in 1275GT mini, AB Performance Sabre, Birkett, Silverstone, Testing | 2 Comments